

I30 Window Regulator Install Made Easy: Installation
For enthusiasts and DIY mechanics, tackling an I30 Window Regulator Install can initially seem daunting. Yet, with proper guidance and the right tools, it becomes manageable. The window regulator is a crucial component that ensures the smooth operation of a vehicle’s windows. When this part malfunctions, it can hinder functionality and convenience. Understanding the installation process helps restore window function and allows individuals to maintain their cars independently. This guide offers a detailed, step-by-step approach to facilitate installation, making it accessible to seasoned and novice mechanics.
Tools Required for Installation
Before starting the Window Regulator Installation, it is fundamental to assemble the necessary tools. Required tools include Phillips and flathead screwdrivers, Torx screwdrivers, a panel removal tool, a ratchet and socket set, and needle-nose pliers. Protective gloves and safety goggles are also essential to prevent injuries.
Preparing the workspace is equally important. Ensuring the vehicle is parked flat and well-lit will minimise potential hazards and streamline installation. Having these tools and preparations in place will ensure the installation progresses smoothly.
Safety Precautions
Wearing protective gloves and safety goggles is crucial to shield against any unexpected debris or sharp components during the Window Regulator Install. Disconnecting the vehicle’s battery will prevent electrical issues, ensuring a safe working environment.
Handling tools and components is necessary to avoid accidents, mainly when dealing with fragile parts like window glass. Using tools correctly and keeping the workspace well-organised will help minimise potential hazards.
Additionally, working in a well-lit area is advisable to improve visibility and reduce the risk of mistakes. Following these safety measures will contribute to a smoother and safer installation process.
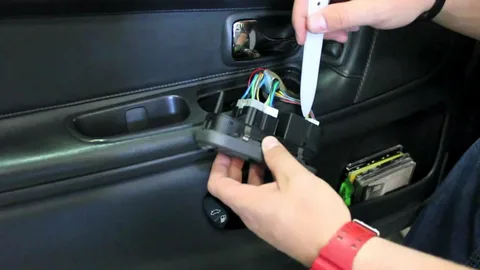
Removing the Door Panel
Begin by locating and unscrewing all visible screws using the appropriate screwdriver. Carefully use a panel removal tool to pry the panel away from the door. Attention to detail is essential to avoid damaging clips or fasteners; gently release them to prevent breakage.
As the panel is being removed, note any electrical connectors that need to be disconnected. Pull the panel away from the door frame, ensuring all attachments are safely detached. Once free, place the door panel securely to prevent damage while the installation continues.
Extracting the Old Window Regulator
With the door panel removed, the window regulator components become visible. Typically, the regulator is secured with several bolts.
Prevent it from slipping.
Using a ratchet and socket set, remove these bolts methodically. During this process, it’s imperative to support the window glass to prevent it from slipping or shattering.
Attached to the regulator
Disconnect any electrical connectors attached to the regulator. Carefully man oeuvre the regulator out of the door frame, not damaging surrounding components.
Temporarily secure
If the window glass obstructs the removal, it may be necessary to temporarily secure it in a raised position using tape or a similar method.
Mounting points
Once the regulator is free, inspect the mounting points and any related hardware for signs of wear or damage.
Installed without complications
This step ensures that the new regulator can be installed without complications. Preparing the workspace and organising removed components will facilitate a seamless transition to installing the new window regulator.
Installing the New Window Regulator
Begin by carefully positioning the new window regulator within the door frame, ensuring it aligns correctly with the window tracks. Secure the regulator by inserting and tightening the bolts using the ratchet and socket set. It is essential to avoid over-tightening to prevent damage.
Reconnect any electrical connectors previously detached, ensuring they are firmly in place. Verify that the regulator mechanism is aligned accurately to facilitate smooth window movement. During this step, it is essential to support the window glass to prevent slipping or breaking.
After securing the regulator, test its movement manually to confirm proper installation. If everything is aligned correctly, proceed to the next steps of the installation process.
Reattaching the Door Panel
Begin by aligning the door panel with the corresponding slots on the door frame. Ensure that all clips and fasteners are positioned correctly to avoid any damage. Once aligned, press the panel firmly into place, starting from the bottom and working upwards.
Reconnect any previously detached electrical connectors, ensuring they click securely into their respective sockets. Pay attention to any hidden clips or fasteners that need securing, as these keep the panel firmly attached. Finally, use the appropriate screwdrivers to refasten all screws that were removed earlier, checking that each one is tightened adequately without overdoing it.
Testing the Installation
Reconnecting the vehicle’s battery is the initial step before testing the newly I30 Window Regulator Install. Activate the window switch to ensure the window moves smoothly along its tracks. It should ascend and descend without any jerky motions or unusual noises.
If the window does not operate correctly, inspect the alignment and secure any loose bolts or connectors. If necessary, check the regulator’s movement manually, ensuring no resistance or misalignment. Address any detected issues promptly to prevent further complications. Additionally, verifying that all electrical connections are secure and intact will ensure optimal performance.
Maintenance Tips
To maintain the optimal performance of the window regulator, it is essential to conduct regular inspections.
- Periodically lubricate the moving parts with an appropriate lubricant to minimise friction and wear.
- This simple step can significantly extend the lifespan of the regulator.
- Additionally, inspect the window tracks for any obstructions, such as dirt or debris, which can impede the smooth movement of the window.
- Removing these blockages promptly will ensure that the regulator functions without hindrance.
- Checking for signs of rust or corrosion, especially in older vehicles, is also advisable, as these can affect the regulator’s performance.
- Regular maintenance will help identify and address potential issues before they become significant problems.
Environmental factors
Environmental factors can significantly impact the performance of the window regulator, particularly in regions experiencing extreme weather conditions.
Increased friction
For instance, excessive heat can cause specific components to expand, leading to potential misalignment or increased friction.
Reduced responsiveness
Conversely, cold temperatures can cause the contraction of the regulator’s material, possibly resulting in brittleness or reduced responsiveness.
Structural integrity
Moisture and humidity also pose risks, leading to corrosion or rust on the metal parts, compromising the regulator’s structural integrity.
Signs of corrosion
Regular inspection for signs of corrosion or wear, especially after exposure to harsh weather, is recommended.
Tracks clean
Keeping the window tracks clean and debris-free can help mitigate environmental stress’s effects.
Weather-resistant
Applying a weather-resistant lubricant to the moving parts can further protect against the adverse effects of temperature fluctuations and moisture. By paying attention to these factors, the longevity and efficiency of the window regulator can be preserved.
Regular Maintenance
Regular maintenance and awareness of environmental factors can further prolong the regulator’s lifespan, ensuring reliable performance. In addition, it is crucial to avoid common mistakes during installation.
Proper support of the window glass, careful handling of bolts and electrical connectors, and ensuring accurate alignment are all key aspects that contribute to a successful outcome. When meticulously followed, these steps help prevent damage and allow the window to operate smoothly.
Environmental considerations also play a significant role in the longevity and efficiency of the window regulator. The component’s performance can be maintained by protecting it from extreme temperatures and moisture and regularly inspecting it for signs of wear. The application of appropriate lubricants and the removal of debris from window tracks further ensure the smooth operation of the window mechanism.
Common Mistakes to Avoid
During the Window Regulator Install, specific common errors can hinder the process and compromise results. One prevalent mistake is neglecting to support the window glass during regulator removal and installation, which can lead to the glass slipping or breaking.
Another error is using excessive force when tightening bolts, potentially causing damage to the regulator or door frame. Failing to align the regulator correctly can result in poor window movement, characterised by jerky motions or misalignment.
Moreover, improper handling of electrical connectors can lead to faulty connections, affecting the regulator’s performance. Ensuring that all electrical connections are reattached securely is crucial. Overlooking the importance of a well-lit and organised workspace can also create unnecessary complications.
Conclusion
The successful I30 Window Regulator Install hinges on thorough preparation, attention to detail, and adherence to safety protocols. Ensuring that all necessary tools are gathered beforehand and the workspace is well-organised establishes an efficient process. Each step, from removing the door panel to installing the new regulator and reattaching the panel, must be executed precisely to avoid common pitfalls such as glass breakage or misaligned components.
FAQs
What tools do I need to install a window regulator in my Hyundai i30?
Answer: You’ll need a few essential tools to install the window regulator, including:
- Screwdrivers (both Phillips and flathead)
- Trim removal tool
- Socket wrench set
- Pliers
- Safety gloves: These tools will help you efficiently and safely perform the installation.
What are the basic steps to I30 Window Regulator Install?
Answer: Ensure safety by disconnecting the car battery before starting the I30 Window Regulator Install. Use a trim removal tool to carefully pry off the door panel and disconnect any electrical connectors. Unbolt and remove the old window regulator from its mounting. Position the new window regulator, secure it with bolts, and reconnect the electrical connectors.
What tips can ensure a smooth and successful window regulator installation for my Hyundai i30?
Answer: As you remove parts and connectors, label them to remember where everything goes during reassembly. Snap photos of each step to reference during reassembly. Keep your workspace clean and organized to avoid losing small parts. Refer to your vehicle’s service manual for instructions and torque settings.
| · Related Business Listings |
| Contact Directory |
| Local Business Profiles |