

How to Draw A Stegosaurus Easily
How to Draw A Stegosaurus. The period when dinosaurs ruled the earth is a fascinating historical time we still know relatively little about.
Also, check our Printable Tiger Coloring Pages.
Dinosaurs managed to capture our imaginations, and there are many different interpretations of how they might have looked and behaved.
Many people have a favorite dinosaur, and Stegosaurus is one of their favorites due to the unique appearance of this dinosaur. Because of this, many people enjoy learning how to draw a stegosaurus.
For people who love this unique dinosaur, this will be a tutorial they will want to see through to the end!
Our step-by-step tutorial on drawing a stegosaurus that we have prepared will show you how to create an adorable depiction of this amazing dinosaur!
How to Draw A Stegosaurus
Step 1
In this first step of our tutorial on how to draw a stegosaurus, we will start with the head and neck of the dinosaur in this first step.
First, draw a circular shape for the stegosaurus' eye, then draw another smaller circle inside.
We then use some curved, rounded lines for the rest of the head and face contour. The top and back of the head are fairly smooth, while the mouth has a pointed tip at the end.
The representation that we will make in this guide will be nice and cute, for this reason, we will give this Stegosaurus an adorable smiling mouth before proceeding to step 2!
Step 2
Stegosaurus walked on four legs, therefore, all four legs were rather short and stocky.
In this tutorial's second step, we will draw the first three of these legs.
The legs are not very long and are bent in a specific way to make it look like this Stegosaurus is running and playing.
There are large, rounded nails at the end of each foot. Then you are ready for step 3 of the guide!
Step 3
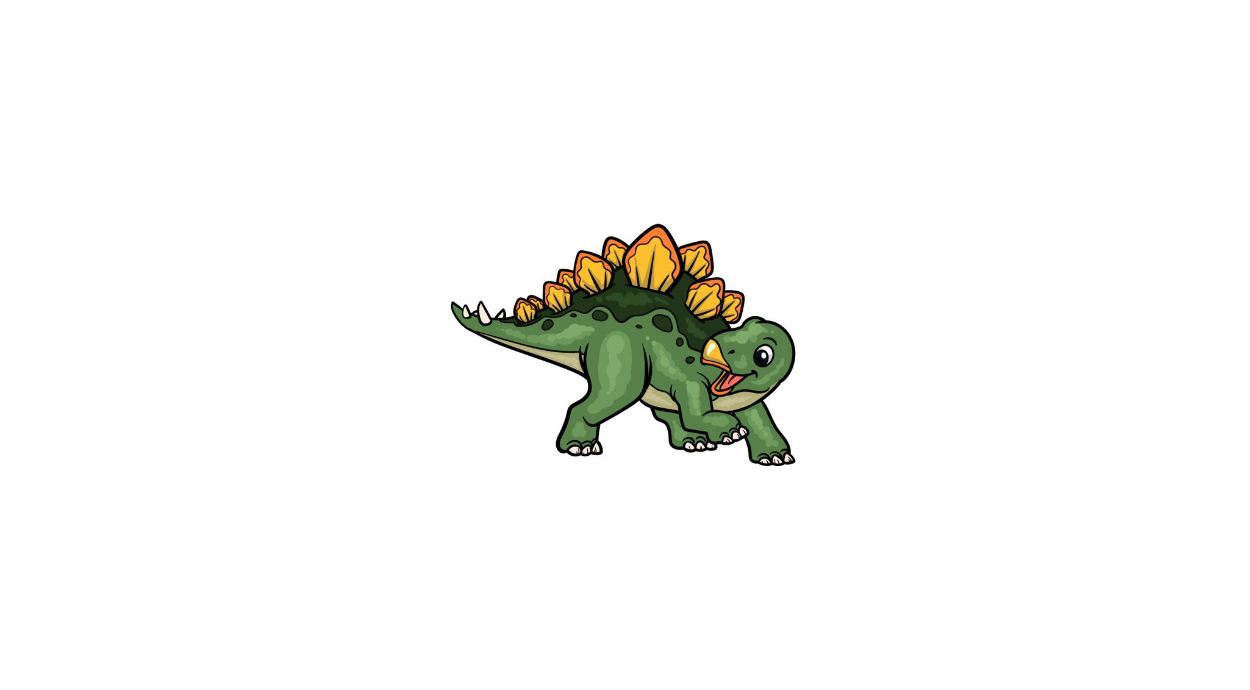
Perhaps the most well-known physical feature of the Stegosaurus is the rows of sharp blades that flank its back.
We will add this in this step of our How to Draw a Stegosaurus guide. They are each drawn with a rounded line with a curved tip at the top.
Each will be a different size. So try to copy them as they appear in our reference image! Place them so that the Stegosaurus's back is also slightly curved.
Step 4
In this step of your stegosaurus drawing, you will add the remaining outlines for the last leg and tail. First, use a fairly straight line for the underside of the tail.
Then we'll draw the back leg with a wide, rounded base that tapers towards the bottom.
It will also be slightly curved and have rounded toenails, similar to the other legs you drew.
Once you've completed all these patterns, you're ready for some final touches in the next step!
Step 5
You are now ready to finish some final details and elements before starting the final step of this how-to-draw a Stegosaurus guide!
First, we added some wavy lines to the inner contours of each blade on the back to give them more definition.
Next, we'll draw another wavy line on the back and add some small circular shapes.
Finally, we finished off the design by adding some small line details on areas like the eyes, mouth, and toenails.
When you have your Stegosaurus ready, you can add some extra elements!
Drawing wallpaper would be fun as you could design a cool prehistoric wallpaper.
Step 6
This is the last step of this stegosaurus drawing, and we will finish it with some colors!
Scientists have tried to pinpoint exactly what dinosaurs looked like, but the truth is that unless someone invents a time machine, we won't know for sure!
Because of this, you have many different ways to color this image.
In our reference image, we used different shades of green for the body while incorporating some nice shades of yellow for the blades on the back.
These colors look great, and you could use similar ones for your design, but feel free to use any of your favorite colors when completing this adorable Stegosaurus!
Your Stegosaurus Drawing is Finished!