A Guide to Disable OneDrive on Windows 10
Windows 10 operating system comes with a lot of features and options that any user can easily access on their computer system. This operating system also consists of several built-in functionalities. And that also includes the OneDrive cloud storage service that is the default save location for all of your files and documents installed on your computer system. To access this storage platform, you need to have a Microsoft account. You can easily create one. Microsoft launched this storage service in the year 2007. And at that time, it was used by a lot of people. The service allows the users to save their data to the cloud to easily recover it.
And along with that, it also enables you to share and sync your files across different devices. The service offers you to have 5GB of storage space for free. And if you need more space, then you will need to pay for it.
Although there are various other cloud storage services that you can easily use to store all of your data, and according to some of the Windows 10 users, Microsoft’s OneDrive cloud storage service is redundant. Many Windows 10 users prefer to use other cloud storage services over OneDrive. If you are also a Windows 10 user and don’t use the OneDrive storage service, it’s better to disable it. Do you know how you can do so? Want to know the method? If you want to see how you can disable OneDrive on your Windows 10 computer, then you should go through this complete article.
The Procedure to Disable OneDrive on Windows 10 Computer
Before getting to the procedures, you need to know that it is not possible to completely uninstall the OneDrive app from your computer as it is Windows built-in functionality. But, you can disable it, which causes it to no longer function. Any Windows 10 user can quickly disable the OneDrive service on their computer. For that, you just need to disconnect your Microsoft account from the storage service, and after this, the service will be disabled on your computer. There are various ways of performing this task. You can use the Windows Settings app for this. Or you can also use the Registry Editor feature. Here, we have provided the three most straightforward methods that you can follow without any problems. So, let’s see the first technique:
Method 1: Instructions to Disable OneDrive through Windows Settings App
You can also use your system’s Settings app to disable OneDrive on your Windows computer. Here’s how this method works:
- First of all, go to the main menu of your device and then search for the OneDrive app.
- And now, you will have to launch the app by clicking on its icon.
- After launching the app, now click on the option of “More” given in the main menu.
- After reaching the next window, choose the option of “Settings.”
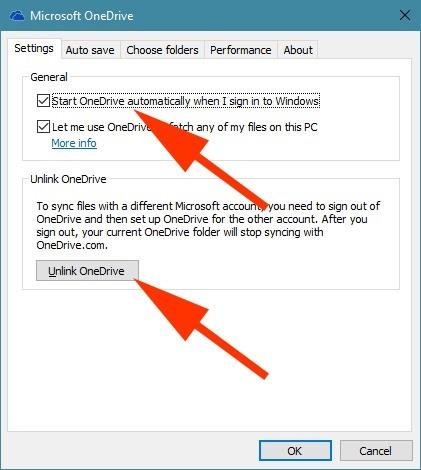
- Now, after reaching the app Settings window, you will have to untick the box given next to the option of “Start OneDrive automatically when signing into the Windows.”
- And after disabling the option, select the account and then click on the option of “Unlink this PC.”
- Proceed further by clicking on the option of “Unlink Account.”
And now, once your account is unlinked, you will be asked to fill in your email address and other essential information on the next window. You will have to wait for a few minutes for the completion of the process. Now, sign out of your OneDrive account, and the next time you log in to your computer, OneDrive will be disabled.
Method 2: Disabling OneDrive Using Group Policy
This is another quick and straightforward way to disable OneDrive on a Windows computer. Here’s how you can disable OneDrive through Group Policy:
- Firstly, to start with this method, use the shortcut key “Windows + R” to open the dialogue box.
- Once the search box appears on your screen, type in the term “gpedit. msc” and then go through the option of “Ok” to proceed.
- And now, you will be redirected to the “Local Group Policy Editor” window. Here, go through the option of “Computer Configuration” that you will find in the Administrative Templates section.
- Proceed with the next step by selecting the option of “OneDrive” and then choosing Windows components.
- And next, when you see a new window appearing on your screen, you will click on the option of “Prevent the usage of OneDrive for file storage.”
- Lastly, click on the option of “Enabled” given in the pop-up window that you will see on your screen. And now, you can complete the procedure by clicking on the option of “Apply.”
- After completion of the procedure, you will need to restart your device.
Method 3: Steps for Disabling OneDrive Using Task Manager
- First of all, to proceed with this method, go to the Start Menu and then click on it.
- Now, click on the search bar and type “Task Manager” to launch the app.
- After launching the app, click on the Startup tab given at the top of the window.
- And now, you will be provided with a few options. You will have to click on the option of “Microsoft OneDrive” app to disable the service. And at last, navigate to the option of “Disable.” And that’s it.
So, with any of these methods, you can quickly disable OneDrive on your Windows 10 computer. Try the procedures now and let us know if you have any doubts. And please keep visiting our website.
Source :- https://a4setup.co.uk/a-guide-to-disable-onedrive-on-windows-10/