

The Ultimate Guide to DIY Product Photography for Beginners
Introduction to DIY Product Photography
So, you've got a product you want to showcase to the world? Well, look no further than DIY product photography! In this guide, we'll show you how to unleash your inner photographer and capture your products in all their glory.
Why DIY Product Photography Matters
Forget hiring expensive professionals or relying on stock images - DIY product photography puts the power in your hands. You know your product best, so who better to capture its essence than you?
The Benefits of Learning DIY Product Photography
By mastering the art of product photography, you not only save money but also gain valuable skills. Plus, you can experiment and get creative with your shots, making your products stand out from the crowd.
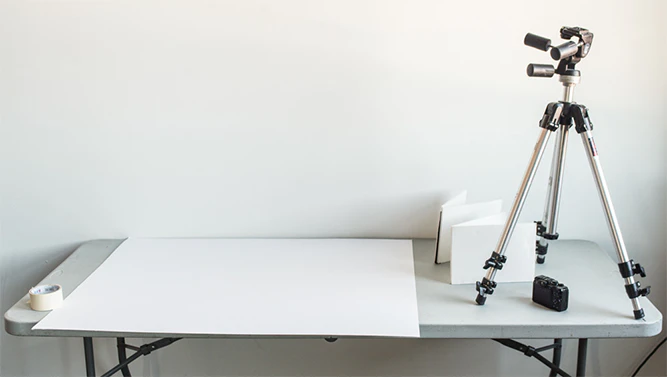
Essential Equipment for DIY Product Photography
Before you dive into the world of DIY product photography, let's talk gear. Don't worry, you don't need a Hollywood studio setup - just a few key essentials to get you started.
Camera Options for Beginners
From smartphones to entry-level DSLRs, there's a camera out there for every budget. Pick one that fits your needs and practice makes perfect!
Tripods and Camera Stands
Avoid shaky hands ruining your shots with a trusty tripod or camera stand. They keep your camera steady, so you can focus on getting that perfect angle.
Lighting Equipment Essentials
Say goodbye to dimly lit photos with proper lighting equipment. Whether it's natural light or artificial setups, good lighting is the secret sauce to stunning product shots.
Setting Up Your DIY Product Photography Studio
Now that you've got your gear sorted, it's time to create your very own photography studio. No need for a fancy space - just a little creativity and organization will do the trick.
Choosing the Right Location
Find a spot with ample natural light or set up artificial lighting for consistency. Remember, the right location can make all the difference in your photos.
Backdrop Selection and Setup
A simple backdrop can elevate your product shots. Experiment with different colors and textures to find what suits your product best.
Organizing Your Workspace
Keep things tidy and organized in your DIY studio. A clutter-free workspace not only looks more professional but also helps you focus on nailing those perfect shots.
Lighting Techniques for DIY Product Photography
Lighting can make or break your product photos, so let's shed some light on the best techniques to make your products shine.
Natural Light vs. Artificial Light
Natural light is great for soft, diffused lighting, while artificial light gives you more control. Experiment with both to see what works best for your products.
Diffusing and Controlling Light
Avoid harsh shadows and overexposure by diffusing and controlling your light sources. Softboxes, reflectors, and diffusers can be your best friends in achieving that picture-perfect lighting.
Creating Shadows and Highlights
Play with shadows and highlights to add depth and dimension to your product photos. Don't be afraid to get creative and experiment with different angles and lighting setups.
Styling and Composition Tips for Captivating Product Photos
When it comes to product photography, styling is key. Start by ensuring your products are clean and free of any dust or smudges. Pay attention to details like arranging products neatly and using complementary props to enhance the overall look. Remember, less is often more when it comes to styling – simplicity can make your product stand out.
Rule of Thirds and Framing Techniques
The rule of thirds is a classic photography technique that can help you create visually appealing compositions. Imagine your photo divided into a grid with two horizontal and two vertical lines. By placing your subject or key elements along these lines or at their intersections, you can create a more balanced and interesting image. Experiment with different angles and framing techniques to find the most flattering ways to showcase your products.
Props and backgrounds play a crucial role in setting the mood and highlighting the features of your products. Choose props that complement your products without overpowering them. Consider using an AI background that provides contrast or add depth to your images. Experiment with different textures, colors, and settings to find the perfect backdrop for your products.
Editing and Enhancing Your DIY Product Photos
Photo editing software can take your product photos to the next level by allowing you to fine-tune details, adjust lighting, and enhance colors. offer a wide range of tools for editing and retouching images. Take the time to familiarize yourself with these tools and experiment with different effects to enhance the overall look of your photos.
One of the most important aspects of editing product photos is adjusting exposure and color balance. Proper exposure ensures that your products are well-lit and easy to see, while the color balance can make your products look true to life. Use tools like brightness, contrast, and color correction to fine-tune these aspects and create a more visually appealing image.
Retouching and Enhancing Product Details
Don't be afraid to retouch your product photos to remove any imperfections or distractions. From removing dust and scratches to enhancing product details, retouching can help you create polished and professional-looking images. Experiment with sharpening tools, cloning brushes, and other editing techniques to make your products shine.
Tips for Creating a Consistent Product Photography Style
Finding your own photography style can set your product photos apart and make them instantly recognizable. Experiment with different lighting, angles, and compositions to develop a signature look that reflects your brand and appeals to your target audience.
Creating a Brand Identity Through Photography
Your product photography plays a significant role in shaping your brand identity. Use consistent styling, colors, and themes across your product photos to create a cohesive brand image. Consider making a style guide or mood board to ensure that your photos align with your brand values and resonate with your customers.
Best Practices for Sharing and Using Your DIY Product Photos
When sharing your product photos online, it's essential to optimize them for different platforms. Resize your images to fit specific dimensions, compress them to reduce loading times, and add relevant keywords and alt text for SEO purposes. By optimizing your images, you can ensure they look their best and reach a wider audience online.
Utilizing Product Photography for Marketing and Promotion
Product photography is a powerful tool for marketing and promotion. Use your photos across different marketing channels, such as social media, websites, and advertising campaigns, to showcase your products effectively. Consider creating engaging visual content like gifs, videos, or 360-degree views to capture the attention of your audience and drive sales.
Adding a Handy Product Photography Tool
If you're looking for tools to enhance your DIY product photography, consider using a product photography tool. This tool can simplify your workflow, providing features like automatic background removal, lighting adjustments, and other enhancements that can help you achieve professional-looking results with ease.
Closing Thoughts on DIY Product Photography
Embrace the Power of DIY Product Photography
As you delve into the world of DIY product photography, remember that practice, experimentation, and continuous learning are key to honing your skills. By investing time and effort into mastering the techniques outlined in this guide, you have the opportunity to showcase your products in a visually captivating way, strengthen your brand's identity, and stand out in a competitive market. With dedication and creativity, you can leverage the art of DIY product photography to elevate your business and leave a lasting impression on your audience.