

How to Separate Colors in Cricut Design Space: Full Guide

Do you want to learn how to separate colors in Cricut Design Space? If yes, then you have reached the right place. This feature is a valuable tool offered by Cricut in the Design Space app. If you are not aware of how to use it, don’t worry! I am going to guide you through the process, and by the end of this write-up, you will be able to separate colors from any design on your phone or computer.
To separate colors from an image, you need the software installed on your device. If you don’t have it yet, you can download it from the official website. Once installed, log in with your account, and then follow the steps to start working on your project.
Why Do You Need to Separate Colors in Cricut Software?
Before learning how to separate colors in Cricut Design Space, it is important to know why you need to separate colors and what projects you can do with them. Separating colors from an image is crucial when working with individual color groups. For example, you like an image or design, but you do not like some particular color. In this case, you can separate colors and work with the ones you like. Also, if you want to work with a single color of some particular image, separating their color will help you do so.
How to Separate Colors in Cricut Design Space on Windows/Mac?
If you want to separate colors from a design on the app, you will have to do a few things. To take action on your Windows and Mac computers, you should follow the steps below:
- First, open the software on a computer.
- Second, select a New Project section to open it.
- Then, click the Upload button on the bottom left corner of your screen.
- Next, you have to click on the “Upload Image.”
- After that, you must pick a compatible image and drag it into the Upload window. You can also click Browse and then select a file to upload. And, you have to continue with the process.
- After uploading an image, you first have to remove the unwanted area of the image.
- Also, you should select Multiple Layers and then press the Continue button.
- On your screen, you have the option to choose how to optimize your cut. To do so, you should select the Uploaded Image type.
- Once you have selected the image type, you have to choose the option for the Output Style. You have to determine the method to assemble a design when you cut it.
- Stacked: It helps you create a solid base layer on which to stack other layers. It is good for paper, vinyl, and iron-on projects.
- Sliced: It helps you create layers. These layers will fit like puzzle pieces without overlapping each other. It works best with the infusible ink.
- Now, you should choose the layers up to 9. You will see that the colors have been assigned automatically based on the colors in your image. You also have the option to adjust the colors on the canvas later.
- To further refine the image, you must use some advanced tools.
- Smooth: It reduces the complexity and smooths the texture of your image.
- Reduce Noise: This helps you reduce fine details while retaining their sharpness.
- Simplify: This tool helps simplify the complexity and improves the chances of a better cut.
- Next, you have to preview the composite image and all its layers. After previewing them, you must click Continue.
- Once you are happy with the image, you have to name, tag, and assign it according to your wish. After that, click on Upload.
- Finally, your multi-layer images will be added to your canvas.
How to Separate Colors in Cricut Design Space on Android/iOS?
You can separate the colors of an image in your Android or iOS phone as well. Here is the process you have to follow for that:
- To upload an image, you have to click Upload on the canvas on your phone.
- Then, you can click a picture or select one from the device’s Photo Library and then select a file.
- Again, you have to remove the unwanted areas. To do this, you can use the Automatic Background Remover tool. After the edit, click Apply.
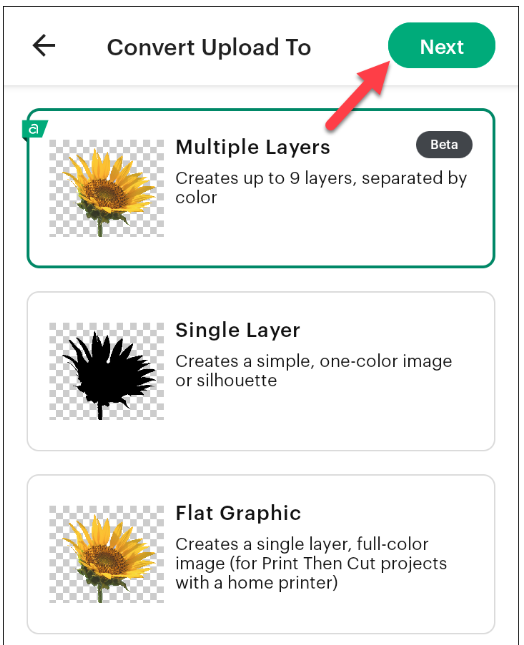
- Next, you will need to click on Multiple Layers. You will find it in the “Convert Upload To” window. Once you choose, you have to select Next.
- Now, you must prepare your image to convert it into multiple layers. For that, you have to go through multiple edit, layer, and advanced edit processes, which you can see in the pictures.
- Once you have edited your image however you wish, you can select Next.
- Now, you should name the file and click on Upload.
- The separation of colors in your image is done.
Conclusion
In short, it is not difficult to learn how to separate colors in Cricut Design Space. If you want to use the tool on the app, you should follow the steps that I have written in this blog. This tool is available on your computer as well as your phone. You can separate colors from an image and then use them however you want.
FAQs
How to Ungroup Designs in Cricut App?
If you want to separate the colors on your Cricut Design Space app for any projects, you can use the Un Group method. To use it, you have to select an image. After that, you should right-click the design and click on the Ungroup button. All the separable parts of the Cricut will be separated.
How Do I Separate a Picture Into Layers by Color?
If you want to separate a picture by color into multiple layers, you can use a few tools. One of the options is the Magic Wand Tool. It will allow you to grab any color within an image. Then, you can use the other tool, UnGroup. For ungrouping an image, you will need to select the image, right-click on it, and then go for ungrouping.
How Do You Separate JPG and PNG into Multiple Colors in Cricut?
To separate your JPG and PNG files into multiple colors, you must first upload the file to the Design Space app. Once the image is uploaded to the app, you will have to remove the background. After that, turn the JPG and PNG formats into SVG formats. Again, upload the image to a new project and split it into multiple layers. Then, you can save them all separately.