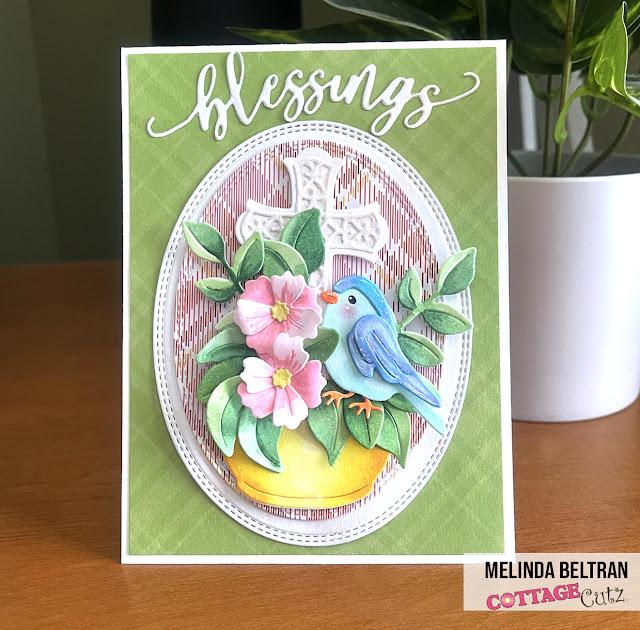
Creating a Beautiful Easter Blessings Card with Flowers and Sparkles

Crafting during holidays is a wonderful way to express creativity and send thoughtful messages to loved ones. Easter, with its vibrant colors and symbols of renewal, offers the perfect occasion to create personalized cards. In this tutorial, we will guide you through the process of making a charming Easter blessings card, complete with crosses, flowers, and a touch of sparkle. Whether you’re celebrating Easter or just want to send a thoughtful blessing to someone, this card will add a personal and heartfelt touch.
Materials Needed
Before we dive into the steps, let’s gather the materials you'll need to bring this card to life:
- White cardstock
- Coloring markers
- Patterned paper (green plaid and any other of your choice)
- Double stitched oval dies
- Adhesive
- Craft glitter or a sparkle pen for added shine
- Die cuts of crosses, flowers, leaves, and a small bird
- Scissors, glue, and any other embellishments of your choice
Step 1: Preparing Your Card Elements
As with most handmade cards, preparation is key. Begin by cutting out all your card elements using white cardstock. This includes two crosses, flowers, leaves, and a bird. Starting with a blank white canvas allows you to customize each piece using your coloring markers. For this card, I used soft pastels and light shades to reflect the delicate tones of Easter.
Once you’ve colored your pieces, you’ll notice how the vibrant colors bring each element to life. From the blooming flowers to the tiny bird, each piece adds a touch of springtime to your card. Don’t be afraid to experiment with colors that match your style and vision.
Step 2: Assembling the Cross
Next, take the two cross pieces and layer them together. Keeping the cross white adds a classic and clean look, but to give it an extra pop, I brushed a little sparkle over it. You can use a sparkle pen or craft glitter for this step. The shimmer subtly enhances the cross, giving it a polished finish without overwhelming the design.
The cross, as the central symbol of Easter, serves as a focal point for the card. The added sparkle symbolizes the radiance and hope of the Easter season.
Step 3: Creating the Flower and Bird Arrangement
With the cross complete, it's time to assemble the flowers and leaves around it. Place the flowers and leaves in a way that frames the cross, creating a balanced composition. For this design, I used soft pastel-colored flowers and green leaves to evoke the freshness of spring.
After assembling the flowers, move on to building the bird. I colored my bird in soft blues and yellows, giving it a cheerful and playful look. Once the bird is complete, place it gently within the flower arrangement, as if it’s perched amongst the blooms. This whimsical touch adds a lively element to the overall design.
Step 4: Layering the Ovals and Patterned Paper
Now that your cross and floral arrangement are ready, it’s time to mount them onto your card. Start by using a double stitched oval die to cut out two oval shapes—one from patterned paper and the other from white cardstock.
For my card, I chose a green plaid paper that adds a fresh, spring-like feel to the background. The plaid pattern complements the floral design without taking away from the main elements of the card.
Mount the floral arrangement onto the smaller patterned oval, and then attach that to the larger white double-stitched oval mat. This layering adds depth and texture, giving your card a professional and finished look.
Step 5: Final Assembly and Finishing Touches
Once your ovals and centerpiece are assembled, adhere them to the front of your card base. You can use foam adhesive to give the design extra dimension. Don’t forget to add any final touches—whether it's more glitter, sequins, or even a stamped sentiment to complete the look.
Here’s a tip: take a moment to step back and view your card from different angles. This will help you see the depth of the flowers and the way the bird fits into the overall design. These small details make your card truly stand out.
Conclusion: A Thoughtful Easter Blessings Card
And there you have it! A beautiful Easter blessings card that’s sure to bring joy to anyone who receives it. With its thoughtful design, delicate flowers, and touch of sparkle, this card captures the essence of the Easter season.
Crafting allows you to infuse a piece of yourself into your creations, and this Easter card is no exception. Be sure to share your crafty adventures with friends and family, and don’t forget to check out my social media for more inspiration. Happy crafting, and may your Easter be filled with love and blessings!
Cricut Birthday Card Designs
cricut logo maker
monogram designs for cricut
cricut logo design
christmas font cricut
- Art
- Causes
- Crafts
- Dance
- Drinks
- Film
- Fitness
- Food
- Jeux
- Gardening
- Health
- Domicile
- Literature
- Music
- Networking
- Autre
- Party
- Religion
- Shopping
- Sports
- Theater
- Wellness
- IT, Cloud, Software and Technology


