

How to Draw A Bubble Letter C
How to Draw A Bubble Letter C
The letter C is a letter that we use a lot. Many words begin with this letter, and even more, have it somewhere in the word.
Also, check our unicorn coloring sheets
If you write it regularly, it's one of the easiest letters to write. Whether it's capitalized or lowercase, it's essentially just a curved line.
While it's easy to write, learning to draw a bubble letter C can be a bit more complicated. This is because there are many curved lines to draw that are difficult to draw!
Luckily we have this guide to make it a lot easier and even more fun! You will have an awesome drawing at the end of the 6 steps we have for you.
How to Draw A Bubble Letter C
Step 1
To start this bubble with the letter C, let's start with the lower left portion of the letter. If you look at the reference image we provided, it may seem very simple.
It's easy, but it might be harder than it looks. The reason for this is that the line can easily become jagged or uneven.
To avoid this, you should go very slowly when drawing the line. Try to keep your hand steady and slowly follow the curve of the line.
If you find it difficult to keep the line smooth and even, you can use a pencil to draw the line and practice.
If the beginning of the letter looks like our reference image, you can go over it with a darker-colored pencil or pen.
Once you're happy with how it looks, we can move on to step 2!
Step 2
In this next step, we will draw the top of your letter C. This is done by extending the line you drew in the first step up and down.
Combining the previous step and this one into one flowing line is best. Remember to keep your hand as steady as possible when dividing it into two lines.
Again, draw the second half of this line with a pencil and trace it with the pen when you're happy.
Another way to draw it would be using a drawing compass. This tool enters your page and allows you to draw a semicircle.
We recommend this if you're having trouble drawing the curved line, as it makes it look too perfectly curved.
Once you have this left side of the C, you can skip stepping 3.
Step 3
In Step 3, we'll draw two more lines that extend inward onto your bubble with the letter C. While these two lines are smaller than the previous ones you've drawn, they're the most difficult yet.
Let's start with the top one; it will curve inwards from where the top line ended. If done correctly, it should be roughly shaped like a horseshoe.
After drawing, we'll repeat what we just did on the bottom half of the C. It will be a mirror image of what you just did.
As you can see in the reference image, there will be a large space near the center of the C. Don't worry; we'll fill it up soon enough.
In the next step of this guide, we'll finalize the pattern to prepare you for some extra details and details!
Step 4
For the outline of this letter C, you must connect the two inside edges you've drawn so far. This is done with a final curved line.
Extend the lines you drew in step 3 inwards until they meet and finish the outline. You have now completed the pattern of this letter C!
If you've drawn guides in pencil, now is the best time to erase them before adding a few more touches.
Using a bold pencil would be a great way to draw the final lines of the C, making it nice and bold. However, you can use any of your favorite drawing tools.
There's no shame in giving this design a few tries before you're happy with how it looks, so take your time and enjoy!
Then you can add some great details and extras in the next step.
Step 5
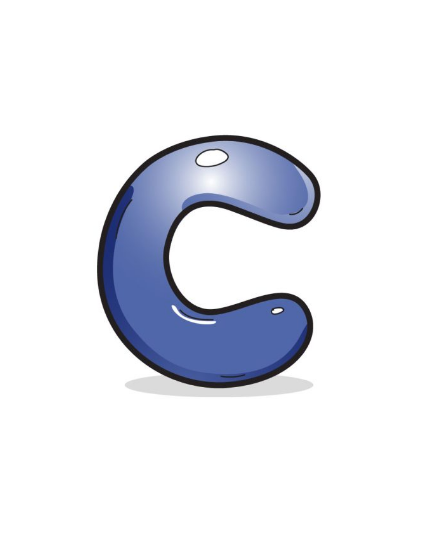
Now your pattern is complete, we can finish with some small details. These extra details we'll add may look super simple, but they'll bring a lot of life to the drawing.
The main goal of this step is to make this C look like it's made out of a bubble. This means it has some depth and reflects light.
You can start by drawing two thin ovals, one larger than the other. In our design, the larger one is higher on the C, and the smaller one is lower.
Next, we drew some simple curved lines on the inside edge of the C's outline. We should add these sparingly as their main purpose is to add depth to the bubble.
Once those details are in place, you're ready for some color! However, remember that you can also add some extra fun touches and details.
You could draw fun patterns or pictures in the outline to make it more unique! We'll cover some fun ideas for you to try later, but let's focus on adding color.
Step 6
You're ready to have some coloring fun for this final step as we finish off this letter C. In our reference image, we showed you what colors we would use for the design.
We used different blue colors to give the letter a nice look. As you can see, we changed how the shadows are light and dark to give them extra depth.
The blue colors we used look great, but feel free to show us what colors you'd like for this design! You can opt for similar colors or unique ones.
No matter what colors you choose, you can try using different shades, similar to how we colored our version.
Mixing dark and light colors makes it more like an object with depth than solid colors. Of course, spot colors can also look great in their way!
If you've drawn patterns or pictures inside the C outline, adding color is also a great way to bring in various colors.
Using different art tools and fun creations can also allow you to make drawing even more unique to you.
Your Bubble Letter C Drawing is Finished!