

Easy Henna Designs That Anyone Can Try – Simple, Stylish & Beautiful
If you're anything like me, you’ve probably stared at those intricate mehndi designs and thought, "Wow, that’s beautiful—but there’s no way I can draw that!" Trust me, I’ve been there. But here’s the truth: easy henna designs do exist, and you don’t need to be a professional artist to create them. I’ve personally tried a bunch of them over the years—sometimes on my own hands, while helping friends before weddings or Eid—and it’s become one of my favorite ways to relax and get creative.
So today, I want to share everything I’ve learned about simple yet stunning mehndi art that looks great but takes very little effort.
Why Simple Henna Designs Are So Popular
Let’s face it—life is busy. Not everyone has the time (or patience) to sit for hours getting full-hand traditional mehndi applied. That’s where easy designs come in. They’re quick, fuss-free, and still give you that elegant, festive vibe. Whether you want something for a casual dinner, a family function, or just because you're feeling artistic, simple henna patterns can add a special touch without any stress.
Basic Tools You’ll Need
Before we dive into actual designs, let’s quickly talk tools. You don’t need a fancy setup. Here’s what I keep in my mehndi kit:
-
A good quality henna cone (preferably freshly made)
-
Tissue or cotton pads (for wiping off mistakes)
-
Lemon sugar mix (to darken the stain)
-
Tape or cling wrap (to protect the design after applying)
That’s it. No complex gadgets—just the basics.
Where to Start: The Key Areas for Easy Henna Application
Now, when you're just starting, it's better to choose areas that are easy to reach and work on. Based on my experience, here are the most beginner-friendly areas:
Fingers Only
Try doing small motifs on each finger—like dots, vines, or swirls. You can leave the palms empty or just add a tiny flower in the center. It looks minimal and classy.
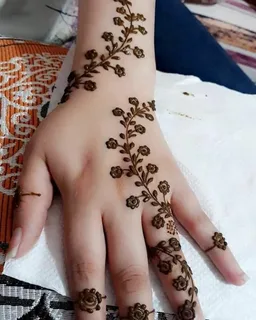
Back of the Hand
It’s easier to draw on the back of the hand than on the palm. You can go with a leafy trail starting from the index finger and flowing diagonally to the wrist. Super trendy and quick!
Wristband Style
Think of a bracelet made of henna. You can make tiny hearts, dots, or checkered boxes around your wrist. It gives a jewelry vibe, and you don’t even need to wear bangles.
Step-by-Step Easy Henna Designs
Let me break down a few go-to designs that I recommend for anyone, no matter your skill level.
The Classic Dot & Circle Combo
Start with a circle in the center of your palm. Add small dots around it, and maybe one or two leafy stems going outward. This design takes less than 5 minutes and looks super neat.
Floral Vines for Fingers
Draw a flower on the tip of your finger. Extend it down with swirly vines and leaves. Do the same for each finger, but change up the flower style a bit. Looks coordinated without being repetitive.
Mandala Magic
Mandalas look complex, but you can simplify them. Just draw concentric circles with patterns like triangles, dots, or scallops. It’s satisfying and doesn’t require perfection.
Minimalist Mehndi
Draw a half-moon near your wrist and fill it with tiny triangles or dots. Add a matching motif on your finger. It gives an aesthetic look and is perfect for daily wear.
Tips to Get the Perfect Stain
Applying the henna is only half the job. To get that deep, rich color, here’s what I always do:
-
Leave it on for at least 5–6 hours, if not overnight.
-
Once dried, dab the lemon-sugar mix every hour.
-
Never wash it off with water. Scrape it with a butter knife or rub with oil.
-
Avoid using lotions or soap on the area for the first 24 hours.
This routine has never failed me, and my mehndi stains always come out dark and beautiful.
Design Inspirations from Real Life
Over the years, I’ve saved screenshots, followed artists, and even taken ideas from nature. Here are a few things that inspire my henna designs:
-
Leaves and trees – Great for drawing flowing, natural vines.
-
Jewelry – Necklaces and anklets can inspire hand or foot designs.
-
Architecture – Think domes, windows, and arches from old buildings.
-
Fabric patterns – Paisleys, checks, and embroidery can be turned into henna.
Sometimes, all it takes is looking around you to find your next beautiful mehndi idea.
How to Practice Without Wasting Henna
Here’s a tip I wish I had known earlier—use a plastic sheet or glass surface for practice. Just draw your design with the cone and wipe it off after it dries. You can also use a tracing book with transparent film.
And don’t forget to take photos of your progress. You’ll be amazed at how quickly your hand gets steadier over time.
Let’s Talk Confidence
One thing I’ve learned through my mehndi journey—it’s not just about the design. It’s about the confidence you feel when you create something beautiful with your own hands. Even if it’s not perfect, it’s yours.
So, the next time you pick up a henna cone, don’t stress. Just go with the flow, trust your creativity, and remember—practice makes pretty.
Final Words from Mehndi Design
Here at Mehndi Design, we believe everyone has an artist inside them. Whether you're sketching your first flower or trying out your 50th mandala, we’re here to guide you with ideas, tips, and human-friendly tutorials that work.
Our blog isn’t about showing off. It’s about sharing the joy of mehndi—one easy design at a time. So, bookmark us, try something new this weekend, and don’t forget to smile when someone compliments your work.