


Gator Vacuum Relay Replacement - Beam Model Guide
Introduction and Project Overview
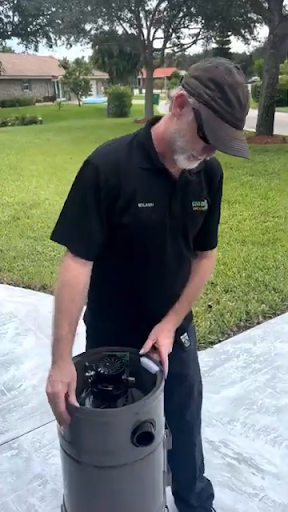
"Hey, guys. This is David of Gator Vacuum in Coral Springs. Today, Ben's gonna show you how to change a relay." watch now : Gator Vacuum - Step-by-Step Relay Replacement Tutorial
Welcome to this step-by-step guide from Gator Vacuum in Coral Springs. In this tutorial, you will learn how to replace a relay on a Beam vacuum model. This guide is designed to help technicians and skilled DIYers complete the job safely and efficiently.
What You Will Learn
This guide walks you through the complete relay replacement process. You will see how to identify the relay, remove the necessary screws, and disconnect the motor wires and ground. Then you will learn how to swap out the old relay for a new one. Finally, you will get tips on reassembly and final checks.
Time and Difficulty
For experienced technicians, this job takes about 5 to 10 minutes. The task requires careful handling of small fasteners and wires. Take your time and work carefully.
Safety First
Before you begin, unplug the vacuum. Make sure to discharge any stored charge. Work on a clean, well-lit surface. This keeps you safe and helps you see the small parts clearly.
What Comes Next
The following sections will guide you through each step. You will learn how to identify the relay and access points. Then you will see how to remove screws and disconnect wires. After that, you will remove the old relay and install the new one. Finally, you will get reassembly tips and troubleshooting advice for working with small fasteners.
Identifying the Relay and Access Points
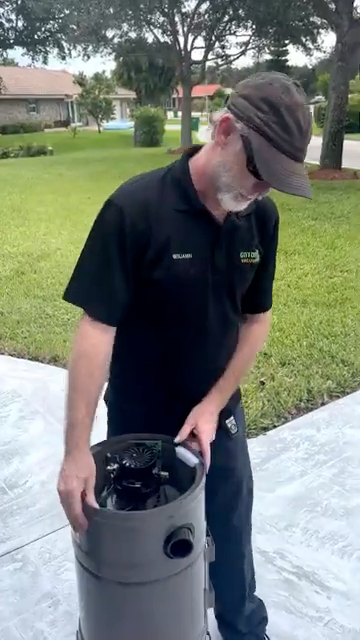
Before you start any work, you need to find the relay. This small but important part controls power to the motor. Knowing where it sits and how to reach it makes the job much easier.
Understanding Your Model
This demonstration uses a Beam vacuum model. The relay location and how it mounts may vary by model. Always check your specific unit before you begin. If you have a different brand or model, the relay might be in a different spot or use different mounting hardware.
Locating the Relay
The relay is a small component mounted behind a panel. It sits inside the vacuum canister. You will need to remove the outer cover or panel to see it clearly. Once you open the unit, look for a small box-like part with wires connected to it.
"On a beam, there's four small small screws. You gotta take those out and unplug the wires from the air for motor."
What Holds the Relay in Place
The relay is secured with four small screws. These screws are very tiny. You must be careful not to drop them or strip the heads. Keep a small container nearby to hold these screws as you remove them.
Tools You Will Need
Gather your tools before you start. You will need:
-
A precision screwdriver set with small Phillips or the appropriate head
-
Needle-nose pliers for handling wires
-
A small container for screws
-
Optional: a magnifier or steady light to see the small parts better
Preparing Your Workspace
Work on a clean, flat surface. Remove the outer cover or panel carefully. This exposes the relay and gives you access to the mounting screws. Take your time with this step. Forcing panels can crack plastic or bend metal.
Documenting Wire Positions
Before you disconnect anything, take a moment to note the wire positions. Use your phone to snap a quick photo. This reference will help you reconnect everything correctly later. Look at how each wire connects to the relay. Note the colors and positions.
Handling Small Parts
The four tiny screws are easy to lose. Place them in your container right away. Keep your work area clear of clutter. Route wires away from the work area. This prevents entanglement and damage as you work.
Visual Cues to Look For
The relay is usually a small rectangular or square component. It has several wire terminals on it. The wires connect to these terminals with small connectors or spade terminals. The relay may have markings or labels showing voltage or part numbers.
Next Steps
Once you have identified the relay and prepared your workspace, you are ready to begin removal. The next section will guide you through removing the screws and disconnecting the wires safely.
Removing Screws and Disconnecting Wires
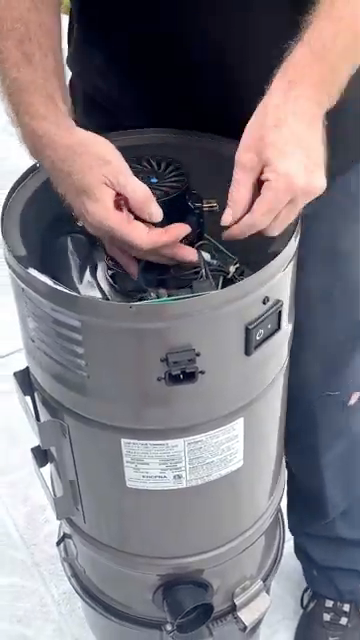
Now that you have located the relay, it is time to remove it. This process involves two main tasks: taking out the small screws and disconnecting the wires. Both require care and patience. Work slowly to avoid losing parts or damaging connections.
Step 1: Remove the Four Small Screws
The relay is held in place by four very small screws. These screws secure either the relay cover or the relay itself to the mounting surface. Use a fine tip screwdriver that fits the screw heads properly. A poor fit can strip the screw heads and make removal difficult.
Hold the screwdriver steady as you turn. Apply gentle downward pressure to keep the tip seated in the screw head. Turn counterclockwise to loosen each screw. Remove all four screws one at a time. Place each screw immediately into your container. Do not set them down on the work surface where they can roll away or get lost.
These screws are tiny and easy to drop. Work over a clean surface. If you drop a screw, stop and find it before continuing. Losing even one screw can make reassembly difficult.
Step 2: Pull Away the Panel
Once all four screws are removed, carefully pull the panel away. You may need to wiggle it gently to free it from any clips or alignment pins. Do not force it. If the panel resists, check that you have removed all fasteners.
Pulling the panel away exposes the relay terminals and the wiring harness. You should now see the relay clearly. You will also see the wires connected to it. Take a moment to look at the layout. This helps you understand how everything connects.
Step 3: Identify the Wiring Arrangement
Look closely at the relay and its connections. This particular relay has three wires on the bottom. The arrangement is important for reconnection later.
"I have three wires on the bottom. The middle one's a ground. Just pull it off."
The middle wire is the ground. The other two wires carry power to and from the motor. Note the color of each wire. Common colors include black, white, and green or bare copper for ground. Your model may use different colors, so rely on position as well as color.
Take a photo with your phone if you have not already done so. This reference image will guide you during reassembly. Make sure the photo is clear and shows each wire and its connection point.
Step 4: Disconnect Each Wire in Sequence
Now you will disconnect the wires. Start with the non-ground wires first. This reduces the chance of accidental shorts. Grasp each connector firmly but gently. Wiggle it slightly from side to side as you pull. This breaks the connection without stressing the wire.
Do not pull on the wire itself. Always grip the connector or terminal. Pulling on the wire can damage the connection inside the insulation. This creates a weak point that may fail later.
After you disconnect the two non-ground wires, disconnect the ground wire last. The ground wire is the middle one. Pull it off gently. It should slide off the terminal easily.
Important Tips for Wire Handling
Use photographs or labels to ensure correct reconnection. If you did not take a photo earlier, do it now before you forget the wire positions. Some technicians use small pieces of tape with numbers or letters to mark each wire. This extra step takes only a moment but saves time and confusion later.
Gently wiggle connectors rather than pulling on the wires themselves. This technique protects the wire and the terminal. If a connector feels stuck, check for a locking tab. Some connectors have a small plastic tab that must be pressed before the connector will release.
Safety Caution
Ensure the vacuum is unplugged and there is no residual power before touching the terminals. Even with the unit unplugged, capacitors or other components might hold a charge. Wait a few minutes after unplugging to allow any stored energy to dissipate. This protects you from shock and prevents damage to sensitive components.
Never touch bare terminals with both hands at once. If there is any stored charge, current could pass through your chest. Use one hand to work on connections while keeping the other hand away from the unit.
Organizing Your Work Area
As you remove each wire, lay it aside in an organized way. Keep wires separated so they do not tangle. Route them away from your work area. This gives you clear access to the relay and prevents accidental tugs on connected wires.
Keep your screw container in a safe spot where it will not tip over. Consider using a magnetic tray if you have one. The magnet holds the tiny screws securely and makes them easy to retrieve.
Checking Your Progress
At this point, all four screws should be removed and stored safely. The panel should be pulled away. All three wires should be disconnected from the relay. The relay itself should now be free or nearly free from its mounting position.
Double-check that you have disconnected all wires. Look for any additional connectors or clips that might still hold the relay in place. Some models use a mounting clip or bracket in addition to screws. Make sure everything is loose before you try to remove the relay.
What Comes Next
With the screws removed and the wires disconnected, you are ready to remove the old relay and install the new one. The next section will guide you through that process. You will learn how to handle the relay safely and ensure the new one is installed correctly.
Removing the Old Relay and Installing the New One
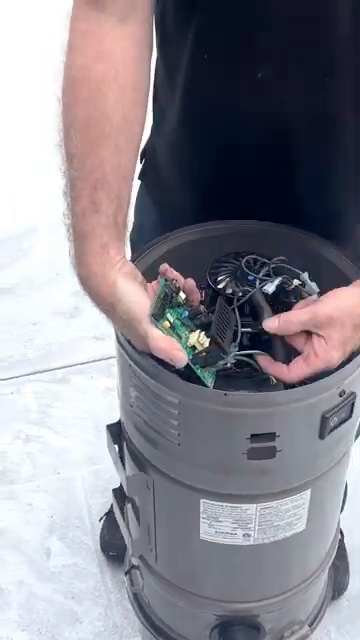
With all the wires disconnected and the screws removed, you are now ready to remove the old relay. This is a straightforward step, but it requires attention to detail. You want to make sure the new relay goes in exactly the same way the old one came out.
Step 1: Remove the Old Relay
The relay should now be free from its mounting location. Carefully lift it out of its position. Hold it by the body, not by any remaining wire stubs or terminals. The relay may fit snugly in a bracket or holder, so you might need to wiggle it gently to free it.
As you remove the old relay, take note of its orientation. Look at how the terminals are positioned. Notice which side faces up and which side faces the mounting surface. The new relay must go in the same way. Some relays have markings or labels on one side. Make a mental note or take a quick photo of the orientation.
Set the old relay aside in a safe place. Do not throw it away yet. You will need it for comparison with the new relay. This ensures you have the correct replacement part.
Step 2: Inspect and Compare the Relays
Before you install the new relay, compare it carefully to the old one. This step is critical. Installing the wrong relay can damage your vacuum or cause it to malfunction.
Check the following features:
-
Terminal positions: The new relay should have terminals in the same locations as the old one. Count the terminals and note their arrangement.
-
Mounting holes: The screw holes should line up perfectly with the mounting surface.
-
Physical size: The new relay should be the same size and shape as the old one. It should fit in the same space without forcing.
-
Ratings: Look for voltage and amperage ratings printed on the relay body. These numbers should match or be compatible with the old relay.
If anything looks different, stop and double-check the part number. Using the wrong relay can cause electrical problems or even create a fire hazard. When in doubt, consult the manufacturer's documentation or contact a professional.
Step 3: Position the New Relay
Once you have confirmed that the new relay is correct, you are ready to install it. Hold the new relay in the same orientation as the old one. Align the mounting holes with the screw holes on the mounting surface.
"And here's your relay. Put the new one in."
Slide the relay gently into position. It should fit easily without force. If you have to push hard, stop and check the alignment. Make sure no wires are caught underneath the relay. Wires trapped under the relay can be pinched or damaged when you tighten the screws.
The relay should sit flat against the mounting surface. All the screw holes should line up perfectly. If one hole does not line up, the relay may be rotated incorrectly. Remove it and try again with a different orientation.
Step 4: Reconnect the Wires
Now you will reconnect the wires to the new relay. This step must be done carefully and in the correct order. Refer to the photo you took earlier. Match each wire to its correct terminal.
Start with the non-ground wires. Push each connector firmly onto its terminal. You should feel it click or seat securely. Give each connector a gentle tug to make sure it is firmly attached. A loose connection can cause arcing, overheating, or intermittent operation.
"Reconnect the ground in the middle."
After the non-ground wires are connected, reconnect the ground wire. The ground wire goes on the middle terminal. Push it on firmly until it is fully seated. The ground connection is essential for safety. A poor ground connection can allow dangerous voltages to appear on the vacuum housing.
Double-check each connection. Make sure every wire is on the correct terminal. Compare your work to the reference photo. Incorrect wiring can cause the relay to malfunction or even damage the motor.
Step 5: Route the Wires Safely
With all the wires reconnected, you need to make sure they are routed properly. Wires should be clear of moving parts, sharp edges, and heat sources. Check that no wire is stretched tight. Wires should have a little slack to allow for vibration and movement.
"Slide it back into position, watch out for all the wires."
As you slide the relay back into its final position, watch the wires carefully. Make sure none of them get pinched between the relay and the mounting surface. Pinched wires can short out or break over time. This causes failures that are hard to diagnose later.
Route wires away from any motors or heating elements. Heat can damage wire insulation and cause shorts. Keep wires away from fan blades or other moving parts that could cut or abrade the insulation.
Step 6: Reinstall the Mounting Screws
Now you are ready to secure the relay with the mounting screws. Retrieve the four small screws from your container. These are the same screws you removed earlier.
Start all four screws by hand before you tighten any of them. This ensures that the relay is aligned properly. Thread each screw into its hole just a few turns. Do not tighten them yet.
Once all four screws are started, tighten them gradually. Work in a crisscross pattern. Tighten one screw a little, then tighten the screw diagonal from it. Then tighten the other two screws in the same way. This distributes the pressure evenly and prevents the relay from tilting or binding.
Tighten the screws firmly but gently. These are small screws in plastic or thin metal. Over-tightening can strip the threads or crack the mounting surface. Tighten just enough to hold the relay securely. If you feel strong resistance, stop. The screw is tight enough.
Step 7: Quality Check
After the screws are tightened, perform a quality check. This step ensures that everything is installed correctly and safely.
First, check the relay seating. The relay should sit flat and firm against the mounting surface. It should not rock or move when you touch it gently. If it feels loose, check that all four screws are tight.
Next, check all the wire connections. Give each connector a gentle tug. It should stay firmly on the terminal. If any connector pulls off easily, remove it and reconnect it properly. Make sure it is pushed all the way onto the terminal.
Look for any wires that are pinched, stretched, or touching sharp edges. Correct any routing problems now. It is much easier to fix these issues while the unit is still open.
If you have a continuity tester or multimeter, you can perform an electrical check. With the vacuum still unplugged, use the tester to verify that the relay contacts open and close properly. Check for continuity between the input and output terminals. This step is optional but recommended for professional installations.
Step 8: Prepare for Reassembly
With the new relay installed and all connections verified, you are ready to reassemble the vacuum. Before you close up the unit, take one last look inside. Make sure no tools or parts are left inside. Check that all wires are routed safely.
Look for any other issues while you have the unit open. Check for loose connections, worn wires, or signs of overheating. Address any problems now before they cause failures later.
Once you are satisfied that everything is correct, you can proceed to reassembly. The next section will guide you through reassembly tips and troubleshooting for small fasteners.
Common Mistakes to Avoid
As you work through this process, watch out for these common mistakes:
-
Reversing wire connections: Always refer to your reference photo. Incorrect wiring can damage the relay or motor.
-
Forgetting the ground wire: The ground connection is essential for safety. Never skip this connection.
-
Over-tightening screws: Small screws in plastic can strip easily. Tighten gently.
-
Pinching wires: Always check wire routing before you slide components into place.
-
Using the wrong relay: Always compare the new relay to the old one before installation.
Why This Step Matters
The relay controls power to the motor. A properly installed relay ensures reliable operation and long service life. Poor installation can lead to intermittent failures, overheating, or even electrical fires. Taking the time to do this step correctly protects your investment and ensures safe operation.
Next Steps
With the new relay installed and all connections secure, you are ready to reassemble the vacuum. The next section will provide tips on reassembly and troubleshooting for working with small fasteners. You will learn how to avoid common pitfalls and ensure a successful completion of the job.
Reassembly Tips and Troubleshooting Small Fasteners
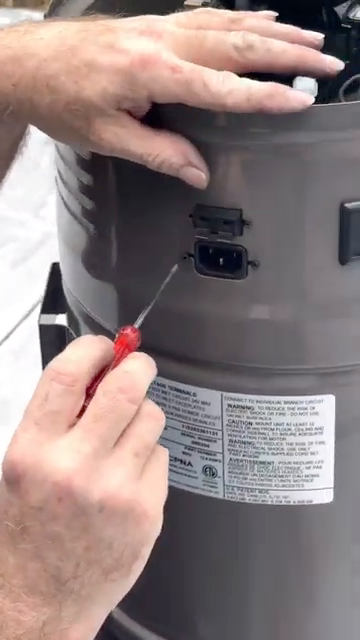
Now that the new relay is installed, it is time to reassemble the vacuum. This step involves working with the same tiny screws you removed earlier. These small fasteners can be challenging to handle. Follow these tips to make the process easier and avoid common problems.
Working with Small Screws
The four mounting screws are very small. They can be difficult to hold and easy to lose. These tiny fasteners require patience and the right technique.
"This screw is gonna be a pain in the butt because they're so small."
Use a magnetic screwdriver bit if you have one. The magnet holds the screw on the tip of the driver. This makes it much easier to position the screw in the hole. You can start threading the screw without using your fingers to hold it. This is especially helpful in tight spaces where your fingers cannot reach.
If you do not have a magnetic bit, try a screw mat or magnetic tray. Place your screws on the mat while you work. The magnet holds them in place and prevents them from rolling away. You can pick up each screw easily when you need it.
Another option is to use a small dab of grease or wax on the screwdriver tip. This creates a temporary hold that keeps the screw on the driver. The adhesion is weak enough that the screw releases easily once it is threaded into the hole.
Technique for Installing Tight Screws
Small screws require a careful technique. Rushing can lead to stripped heads or cross-threaded holes. Follow these steps for best results.
First, position the screw in the hole. Hold the screwdriver straight and aligned with the hole. Do not angle the driver or the screw may not thread properly.
Apply steady downward pressure as you turn. The pressure keeps the driver tip seated in the screw head. This prevents the tip from slipping out and damaging the head. Turn slowly and smoothly. You should feel the screw threading into the hole.
If the screw does not turn easily, stop. Do not force it. Back the screw out and try again. The screw may be cross-threaded or the hole may be damaged. Starting over takes only a moment and prevents damage.
For better visibility, use magnification. A magnifying glass or lighted magnifier helps you see the tiny screw head clearly. This is especially useful if you have trouble seeing small parts. Good lighting is essential. Position a bright light directly over your work area.
Troubleshooting Stuck Screws
Sometimes a screw will not turn easily. It may feel tight or stuck. This can happen if the threads are dirty or if there is corrosion in the hole. Do not force the screw. Excessive force can strip the threads or break the screw.
Try these solutions if a screw is stuck:
-
Use a slightly larger driver: A driver that fits the screw head more snugly gives better engagement. This reduces the chance of stripping the head.
-
Apply penetrating oil: If the screw is accessible, apply a small amount of penetrating oil around the threads. Let it sit for a few minutes. The oil works into the threads and loosens corrosion or debris. Wipe away excess oil before you continue.
-
Check for cross-threading: If the screw turns but does not tighten, it may be cross-threaded. Back it out completely and start again. Make sure the screw is aligned straight with the hole.
-
Clean the threads: Use a small brush or compressed air to clean debris from the screw hole. Dirt or plastic shavings can prevent proper threading.
Never apply excessive force. If a screw will not turn after trying these solutions, the threads may be damaged. You may need to use a slightly larger screw or repair the threads with a tap or thread insert.
Confirming Proper Screw Torque
Tightening screws correctly is important. Screws should be snug but not overtightened. The right torque holds the relay securely without damaging the mounting surface.
Small screws in plastic housings are especially vulnerable to over-tightening. Plastic threads can strip easily. Too much force can also crack the housing. This creates a weak point that may fail later.
Tighten each screw until you feel resistance. Then give it a final small turn. The screw should feel firm but not extremely tight. If you feel the resistance suddenly increase or if the screw starts to turn freely, stop immediately. These are signs that the threads are stripping.
Use a crisscross pattern when tightening multiple screws. Tighten one screw partway, then tighten the opposite screw partway. Continue this pattern until all screws are tight. This distributes the pressure evenly and prevents warping or binding.
Final Inspection Checklist
Before you close up the vacuum completely, perform a final inspection. This checklist ensures that everything is correct and safe.
Check for loose wires: Look at every wire connection. Make sure each connector is fully seated on its terminal. Give each wire a gentle tug. It should stay firmly attached. Loose wires can cause arcing, intermittent operation, or complete failure.
Check for pinched insulation: Examine every wire for damage. Look for places where the insulation is pinched, cut, or abraded. Damaged insulation can cause shorts or shocks. If you find any damage, repair or replace the wire before you continue.
Confirm the relay is seated flush: The relay should sit flat against the mounting surface. It should not rock or tilt. If the relay is not flush, one or more screws may not be tight. Check that all mounting screws are properly tightened.
Verify wire routing: Wires should be routed away from moving parts, sharp edges, and heat sources. Make sure no wire is stretched tight. Wires should have a little slack to allow for vibration. Check that no wire touches the motor or any hot surface.
Look for forgotten tools or parts: Before you close the unit, look inside carefully. Make sure no tools, screws, or other objects are left inside. A loose screw or tool can cause noise, damage, or electrical shorts.
Check the mounting panel: If you removed a cover or panel, make sure it is ready to reinstall. Check that the panel is not cracked or damaged. Make sure all alignment pins or clips are intact.
Test Run Procedure
After you complete the final inspection, you are ready for a test run. This confirms that the relay replacement was successful and that the vacuum operates correctly.
First, reassemble the external panels. Replace any covers or housings you removed. Secure them with their mounting screws. Make sure everything is tight and properly aligned.
Next, plug in the vacuum. Make sure the power cord is in good condition. Check that the plug fits snugly in the outlet.
Run a brief functional test. Turn on the vacuum and listen to the motor. It should start smoothly and run steadily. The motor should not make unusual noises or hesitate. Let it run for about 30 seconds to one minute.
If the motor does not start, turn off the vacuum immediately. Unplug it and recheck your work. Verify that all wires are connected correctly. Make sure the relay is installed in the correct orientation. Check that all screws are tight.
If the motor starts but runs roughly or makes strange noises, stop and investigate. Unusual sounds can indicate loose wires, a damaged relay, or other problems. Do not continue to run the vacuum if it sounds abnormal.
If the motor runs smoothly and quietly, the replacement was successful. The new relay has resolved the issue. You can now use the vacuum normally.
Additional Tips for Success
Here are a few more tips to help you complete the job successfully:
-
Work in good light: Bright, direct lighting helps you see small parts clearly. Consider using a headlamp or task light.
-
Take your time: Rushing leads to mistakes. Small fasteners and delicate wires require patience.
-
Use the right tools: A precision screwdriver set and needle-nose pliers make the job much easier. Magnetic tools are especially helpful.
-
Document your work: Photos and notes help you remember how everything goes together. This is especially useful if you are interrupted during the job.
-
Keep parts organized: Use small containers or a magnetic tray to hold screws and small parts. This prevents loss and confusion.
When to Seek Professional Help
Some situations require professional assistance. If you encounter any of the following issues, consider contacting a qualified technician:
-
Damaged threads: If screw holes are stripped or damaged, special repair techniques may be needed.
-
Incorrect relay: If the new relay does not match the old one, you may need help identifying the correct part.
-
Persistent problems: If the vacuum still does not work after the relay replacement, there may be other issues that require diagnosis.
-
Safety concerns: If you see signs of overheating, melted insulation, or other damage, professional inspection is recommended.
Conclusion
Reassembling the vacuum after a relay replacement requires care and attention to detail. Small screws can be challenging, but the right tools and techniques make the job manageable. Follow the inspection checklist to ensure everything is correct. Complete a test run to verify that the replacement was successful. With patience and careful work, you can complete this repair confidently and safely.
Final Wrap-up, Contact Info, and Service Offer

Summary of the Relay Replacement Process
You have now completed the full relay replacement process. This job involves removing four small screws, disconnecting three wires, swapping out the old relay, and reinstalling everything. The middle wire is the ground. The other two wires carry power to and from the motor. When done correctly, this repair restores your vacuum to full operation.
For an experienced technician, this job typically takes under ten minutes. If you are working on this model for the first time, allow extra time. Familiarizing yourself with the layout and handling the tiny screws requires patience. Take your time and work carefully. Rushing can lead to mistakes or lost parts.
"You guys saw, what, maybe five, ten minutes at most."
When to Call a Professional
Some situations require professional help. If you need electrical diagnosis, call a technician. If components appear damaged or burned, do not attempt the repair yourself. If you are uncomfortable working with electrical parts, it is safer to seek professional assistance.
Professionals have the tools, experience, and training to diagnose complex problems. They can identify issues that are not obvious to the untrained eye. They can also perform safety checks that ensure your vacuum operates correctly and safely.
Contact Information
Gator Vacuums of Coral Springs is available for on-site service. The team can come out to your location for repairs. This mobile service saves you the trouble of disconnecting and transporting your vacuum.
"Give us a call. Nine five four three four one four three two three. I'm David again at Gator Vacuums of Coral Springs. Remember, we come out to you."
Phone: 954-341-4323
Call this number to schedule service or to ask questions about your vacuum. The team at Gator Vacuums has experience with many brands and models. They can help you troubleshoot problems and provide expert repairs.
Service Note
Gator Vacuums offers mobile service. They come to your home or business. This convenience means you do not have to remove the vacuum from your wall or transport it to a shop. The technician brings all the necessary tools and parts. They complete the repair on site, saving you time and effort.
Mobile service is especially helpful for central vacuum systems. These systems are built into your home and cannot be easily moved. Having a technician come to you is the most practical solution.
Final Safety Tip
Always prioritize safety when working with electrical equipment. Unplug the vacuum before you start any work. Make sure there is no power to the unit. Wait a few minutes after unplugging to allow any stored charge to dissipate.
Double-check all connections before you power the unit back on. Make sure every wire is on the correct terminal. Verify that all screws are tight and that no wires are pinched or damaged. A few extra minutes of checking can prevent serious problems later.
Never work on electrical equipment if you are unsure or uncomfortable. There is no shame in calling a professional. Safety is always the top priority.
Conclusion
Replacing a Beam relay is a straightforward job when you follow the correct steps. Remove the four small screws, disconnect the three wires with the ground in the middle, swap the relay, and reinstall everything. Work carefully with the tiny fasteners and double-check all connections.
If you need help, Gator Vacuums of Coral Springs is ready to assist. They offer mobile service and can come to your location. Call 954-341-4323 to schedule service or ask questions. With the right approach and attention to detail, your vacuum will be back in service quickly and safely.
Visit us : gatorvacuum.com
Watch Video now : https://youtu.be/0uIrjuAmmbE?si=S2RbvK80ZbW_8E7E

 Arabic
 Français
 Español
 Português
 Deutsch
 Türkçe
 Dutch
Dutch
 Italiano
 Russian
 Romaian