


Creating a Vibrant Spring-Themed "B" Sign for Table Décor
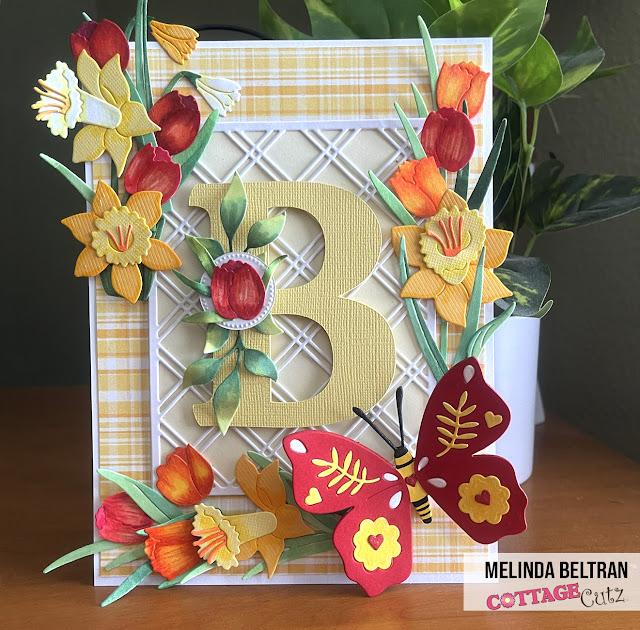
Are you looking for a fun and creative DIY project to add a personal touch to your table décor? Today, I’m excited to share a delightful crafting project I made for my home – a customized "B" sign full of spring vibes! With bright colors, floral accents, and a touch of personalization, this piece is sure to make a charming addition to your decor. Let’s walk through the steps to create your own version of this cheerful and unique sign!
Materials You Will Need
Before we dive into the crafting process, gather the following materials:
- White cardstock (5x7 inches)
- Designer paper for matting
- Lattice background die
- Cream cardstock
- Yellow cardstock (for the letter "B")
- Cardstock for flowers (daffodils, tulips) and butterfly
- Markers for shading and coloring
- Pierced circle die
- Foam tape for dimension
- Adhesive
Step 1: Preparing the Base
The base of this project begins with a piece of 5x7 white cardstock. This will serve as the foundation of your design. For a polished and vibrant look, I matted the white cardstock with a custom piece of designer paper that I created. Choose a pattern or color that complements your overall theme – in this case, something spring-inspired with soft pastels or floral designs works wonderfully.
Once your base is ready, you’ll want to layer it with a beautiful lattice background die cut. I used cream cardstock for this to create a soft, neutral background, allowing the colors of the embellishments to pop. After adhering the lattice layer onto the base, we’re ready to move on to adding the focal elements.
Step 2: Crafting the Letter "B"
The main focus of the sign is the letter "B," which I cut from a piece of yellow cardstock. In my project, the "B" represents the first letter of our family’s last name, but you can easily customize this with any letter that suits your purpose. Using a bright color like yellow helps the letter stand out against the neutral background.
After cutting out the "B," set it aside as we move on to creating the floral embellishments that will give this project its vibrant spring theme.
Step 3: Creating the Floral and Butterfly Accents
One of the highlights of this project is the floral and butterfly accents. For the flowers, I cut out shapes for daffodils and tulips using white cardstock. I then shaded and colored these pieces using markers to bring them to life. The flexibility of starting with white cardstock allows you to fully customize the color scheme to your liking. For my project, I chose soft yellows and pinks to give the sign a sunny, cheerful feel.
The butterfly adds another whimsical touch. I used a folk art butterfly die and cut the wings from red cardstock. The intricate details of the butterfly were colored with yellow markers, giving the design extra depth and vibrancy.
Step 4: Assembling the Elements
Now that you have your flowers, butterfly, and letter ready, it’s time to bring the pieces together. First, take the smallest pierced circle die and attach a tulip head along with some foliage to it. The leaves, like the flowers, started out as plain white cardstock, which I colored with markers for a cohesive look.
Once the floral elements are prepared, mount the letter "B" onto foam tape to give it some dimension. This adds a lovely, raised effect that gives the sign more visual interest. Position the "B" onto the center of your layered mat, and arrange the flowers and butterfly around it for a balanced design.
Step 5: Finishing Touches
To complete your project, take a step back and look at the arrangement. Adjust any elements as needed until you're satisfied with the overall composition. The foam-mounted letter, vibrant flowers, and fluttering butterfly create a festive, spring-inspired design that will brighten up any table display. The pops of color and 3D elements give the sign a lively, dynamic feel.
Final Thoughts
This DIY spring "B" sign is a fun and creative way to add a personal touch to your home décor. Whether you use it as part of your seasonal decorations or as a personalized gift for someone special, it’s a project that allows you to express your creativity. The combination of custom floral embellishments, colorful accents, and raised lettering makes this a standout piece that’s sure to bring a smile to anyone who sees it.
I hope you enjoyed this tutorial! Don’t forget to check back for more crafty adventures and be sure to follow me on social media for updates on new projects. Happy crafting!
business cards cricut
Mega SVG Bundle
butterfly images for cricut
Cricut Design
cricut designs free download
disney cricut shirt ideas

 Arabic
 Français
 Español
 Português
 Deutsch
 Türkçe
 Dutch
Dutch
 Italiano
 Russian
 Romaian