


-
38 Publicações
-
1 fotos
-
0 Vídeos
-
Reside em Texas City, TX, USA
-
De Texas, USA
-
Male
-
01/01/1991
-
Seguido por 1 pessoas
Pesquisar

Atualizações Recentes
-
How to Work With App Library on Your iPhone
AppLibrary,iPhone,
https://jonsnow917340901.wordpress.com/2020/09/23/is-your-apple-watch-troubling-you-heres-how-to-troubleshoot-and-fix/
Nothing could organize your home screen and widgets as flawlessly as the App Library of iOS 14 on your iPhone.
How to Work With App Library on Your iPhone AppLibrary,iPhone, https://jonsnow917340901.wordpress.com/2020/09/23/is-your-apple-watch-troubling-you-heres-how-to-troubleshoot-and-fix/ Nothing could organize your home screen and widgets as flawlessly as the App Library of iOS 14 on your iPhone.Sometimes using your old gadgets seem so comforting no matter the condition of it. It is because upgrading requires a lot of effort, and even if you pass through the same, the device starts creating fuss which is annoying to handle.
If you’re one of those who have upgraded your Apple Watch and it’s not behaving, you don’t have to panic. Even the newest of technologies can act mad at times, which has a definite fix. Below is a guide on potential fixes for issues occurring with your new Apple Watch. So, read along to know more!
How to Troubleshoot Your Apple Watch?
A gadget can bring up any sort of issue, and you should be aware of the potential fix.

If Any App is FrozenFrozen apps are a very regular issue that comes up with all the devices. Fixing an application on your Apple Watch is pretty easy. In case the app has stopped responding, doesn’t interact, or anything else, follow some of the tricks mentioned below:
- Relaunch the app on your Apple Watch. All you have to do is press the Digital Crown and return to the home screen. Wait for a few seconds and relaunch the app.
- In case relaunching doesn’t work for you, you may force quit. Press and hold the side button of your Apple Watch until the sliders start appearing. Next, press the Digital Crown for a few seconds, until you see the home screen.
If Your Apple Watch is Slow
Dealing with a slow Apple Watch? It might need a fresh start and to do the same you’ll have to restart your watch. The steps to restart an Apple Watch are:
- Press and hold the side button for a few seconds until you see the digital switches.
- Slide the switch to the right to turn off your Apple Watch.
- To restart the watch, press and hold the side button for a few seconds until you see the Apple logo on your screen.
If restarting your Apple Watch doesn’t fix the error, try rebooting your iPhone. Also, don’t forget to check software updates on the iPhone’s Apple Watch App. The steps to check for updates are:
- Launch the Apple Watch App on your Apple device.
- Click and select the ‘My Watch’ tab at the bottom of the screen.
- Select the ‘General’ option from the menu.
- Click on the ‘Software Update’ option and check if there’s any.
If the Apple Watch Isn’t Detecting Your iPhone or the Network
Sometimes an Apple Watch does not detect your Apple device or the network and notifies you as ‘Disconnected.’ Hold on, don’t get anxious! Here are some steps you can follow and fix the issue:
- Make sure that Airplane Mode is disabled on your Apple Watch and the other Apple device. Also, Bluetooth must be enabled.
- If the Bluetooth is already turned on, try disabling and then enabling the same.
- Reboot your Apple Watch.
- Reboot your Apple device to which the watch is connected.
If Your Apple Watch is Still Malfunctioning After a Restart
If you’re still unable to use your Apple Watch, it is finally time for restoring the same. It sounds like a struggle; however, load off the stress of backing up the data as your iPhone creates an Apple Watch backup during daily use. Also, losing your Apple Watch data should be the least of your concern as it is unlikely.
This is pretty much it! The above-mentioned are all the potential fixes you may try to get back your Apple Watch to proper functioning. However, if nothing helps, you can contact the Apple Support team and book an appointment. It is the best solution, at last, to seek help from the professionals.
SOURCE:- Is Your Apple Watch Troubling You? Here’s How to Troubleshoot and Fix
0 Comentários 0 Compartilhamentos 3K Visualizações 0 Anterior -
Call of Duty Mobile: Reward for Hunt for Makarov
CallofDutyMobile,HuntforMakarov,
https://jonsnow917340901.wordpress.com/2020/09/23/spellbreak-guide-to-use-conduit-class/
Call of Duty Mobile recently launched a fresh content in the game with plenty of rewards to offer.
Call of Duty Mobile: Reward for Hunt for Makarov CallofDutyMobile,HuntforMakarov, https://jonsnow917340901.wordpress.com/2020/09/23/spellbreak-guide-to-use-conduit-class/ Call of Duty Mobile recently launched a fresh content in the game with plenty of rewards to offer.Among all six different types of classes in Spellbreak, Conduit Class may stun you through its power if used in the right way. “Conduit” Class is a completely different class from other classes. It does not have explosive abilities like Pyromancer or as tanky as Stoneshaper. Conduit has enough abilities hidden in its sleeves that players can access. So here is the guide to striking down the opponents using powerful, electrifying moves.
Conduit Class Overview
Conduit is a lightning ability that shines because of its high DPS value in close and medium-range. Its primary attack is Lightning Bolt. It’s a fast move that deals amazing damage, but when using it on a long-range enemy, its damage decreases. It cost less mana, so it allows the player to use 6 bolts back to back before running out.

The Lightning Strike sorcery will call for an extremely powerful lightning strike attack from the sky. When it hits the opponent, it releases a shock wave and prevents them from using their abilities for a short period.
Every level offers a fresh passive move to boost the power of Conduit:
Level 1: Potential Energy – Lightning Bolt puts +1 damage on every fired bolt until you break off casting, reaching a maximum +5.
Level 2: Overload – Your every Lightning Strike will get +1 Rune charge, but it will max out to +1.
Level 3: Power Surge – When using the Lightning Strike, the mana cost removes all spells for 4 seconds.
Level 4: Secondary Strike – Lightning Strike will strike 4x times/per cast.
Best Secondary Gauntlet
Conduit’s lightning links perfectly with Toxic, Frost, and Wind. Applying the lightning with poison clouds will damage everyone whoever it hits while linking it with the tornado will form a shockwave. The shockwave has more serious damage, and it also hits everyone that comes in range. While the shocking ice trail with the ground makes a shock trap for the one whoever goes through it.
Best Runes and Talents
For Conduit, the two best runes are “Flight” and “Springstep.” The specialty of having huge mobility can benefit the player to put constant damage. Among both, Flight offers better mobility that player to target the enemy while using Tornado and Lightning Strike combos. While in Talents, there are few amazing choices that players can try.
Body: Fervor – It increases the speed of spell casting. Players who have higher DPS, they should use this talent.
Mind: Tracking – When hitting an opponent, you’ll see a red guide outline for the whole squad. Use it as a supporting talent, and it helps you for better team coordination.
Spirit: Thirsty – It improves the Shard and Potion consumption speed, and if your teammates are close to its range, it will only affect 50%. For supporting the team and individual, this skill can help you a lot.
Best Combination Attacks
Conduits are perfect for the burst damage, but it’s necessary to have some versatile tools to slow down the enemy.
Lightning Strike + Tornado: It constructs lightning tornados that shock the foes and deals with extreme damage.
Lightning Bolt + Toxic Cloud: It fills the toxic clouds along with lightning to damage the opponent through shock and poison simultaneously.
Lightning Bolt + Flash Freeze: Steam of water or puddles turns electrified and deal damage through inside.
Conclusion
Among all six classes, Conduit is packed with some unique abilities. By combining the powers, players can increase their chances of disabling the opponent’s abilities. However, it happens just for a limited period, so it is necessary to keep ready with another move to dominate in battle.
0 Comentários 0 Compartilhamentos 3K Visualizações 0 Anterior -
Spellbreak: Guide to Use Conduit Class
Spellbreak,ConduitClass,
https://jonsnow917340901.wordpress.com/2020/09/23/call-of-duty-mobile-reward-for-hunt-for-makarov/
Among all six different types of classes in Spellbreak, Conduit Class may stun you through its power if used in the right way.
Spellbreak: Guide to Use Conduit Class Spellbreak,ConduitClass, https://jonsnow917340901.wordpress.com/2020/09/23/call-of-duty-mobile-reward-for-hunt-for-makarov/ Among all six different types of classes in Spellbreak, Conduit Class may stun you through its power if used in the right way.Call of Duty Mobile recently launched a fresh content in the game with plenty of rewards to offer. The “Hunt for Makarov” is live in Call of Duty Mobile Season 10. “Vladimir Makarov” is a popular villain of Call of Duty. Now in the latest Season 10, players are asked to hunt down the Makarov. The hunt has already started, and it will be over on 1 October, but there are several rewards related to this mission that players can earn.
Call of Duty Mobile officially confirmed about the mission through their Twitter account. In the video post, they posted a Season 10 gameplay video. This mission is huge, so the rewards too. By playing the Battle Royale or multiplayer mode, players can earn the explore points.

To unlock a new event, players have to complete twelve stages first that will also provide exploration points. Exploration points depend on the player’s playtime. So, the more players play the game, the more points they will earn after completing. The content and reward of every stage are different from each other. Once you finish the entire stages, they can get the “Makarov’s First Horseman Frame.”
“Exploration Points” indicate how much exploration and items a player has found during the challenge. So instead of simply completing the levels, players have to explore the items to get the exploration points. If you successfully earn enough exploration points, you can get the calling cards, amazing skins, and more rewards.
- SMRS Forest Felt skin
- Smoke Grenade Forest Felt skin
- Backpack One Iridescent skin
- S36 Iridescent skin
- Frag Grenade Forest Felt skin
- Striker Forest Felt Skin
- Ninja Forest Felt skin
- Knife Iridescent skin
- Beastly Pursuit calling card
- Man-O-War Iridescent skin
- M4 Feral Stalker skin
- BK57 Forest Felt skin
- Makarov’s First Horseman Frame
Call of Duty Mobile launched in 2019, and since then, the popularity graph of the game keeps rising. By launching various challenging modes, Call of Duty Mobile earned much appreciation. They once released the zombie mode but removed after a few months. The total focus of Call of Duty Mobile is on the entertainment of the players. Every week, developers release new tasks to complete. Some of the tasks are long enough that run through a couple of few weeks. In terms of entertainment and challenge, Call of Duty Mobile is currently on top. Call of Duty Mobile also provides free rewards to players which is quite nice for gamers.
Recently an interesting rumor spreading out that Call of Duty: Warzone will release on mobile. However, there’s no confirmation of this, but if this happens, the experience of Warzone will replace the Call of Duty Mobile. It will be interesting to see if there’s space for both games on mobile.
Conclusion
In the mobile Battle Royale games category, Call of Duty Mobile is a top-rated game. Players are getting challenges and rewards every week. The Battle Royale experience in Call of Duty Mobile is unique and better than many mobile Battle Royale games. Currently, the Hunt for Makarov event is active, and players have to complete it to win special rewards.
0 Comentários 0 Compartilhamentos 3K Visualizações 0 Anterior -
Is Your Apple Watch Troubling You? Here’s How to Troubleshoot and Fix
AppleWatch,TroubleshootandFix,
https://jonsnow917340901.wordpress.com/2020/09/23/how-to-work-with-app-library-on-your-iphone/
Sometimes using your old gadgets seem so comforting no matter the condition of it.
Is Your Apple Watch Troubling You? Here’s How to Troubleshoot and Fix AppleWatch,TroubleshootandFix, https://jonsnow917340901.wordpress.com/2020/09/23/how-to-work-with-app-library-on-your-iphone/ Sometimes using your old gadgets seem so comforting no matter the condition of it.Nothing could organize your home screen and widgets as flawlessly as the App Library of iOS 14 on your iPhone. The app library feature manages all the applications to keep you away from the clutter. The apps are grouped or categorized automatically and enable you easy access to the same. Interestingly, you can distinguish recent and old apps and organize them in two different folders. Not only this, but you can choose to keep the widgets appearing on the home screen or just the Library.
Some people might find it difficult to locate the App Library on an Apple device. However, it is easy to find as all you require to do is swipe towards the left on the home screen and hop to the last screen. Once you find the App Library, you can expand the categories to view more apps and launch the same.

How to Add an App to the App Library?Well, all the apps automatically appear in the App Library; however, if you want an app specifically to appear only in the Library section, you can do the same by following the steps below:
- Press and hold on any app that you want to add to the Library.
- A pop-up menu will open. Select the ‘Remove App’ option.
- A new confirmation menu will come up. Select the ‘Add to Library’ option.
An application will be added to the App Library screen.
How to Enable App Downloads to Only Appear in the App Library?
You can enable the settings on your iPhone to make the new app downloads appear only in the App Library section. Follow the steps mentioned below to do the same:
- Launch the ‘Settings’ app on your iPhone.
- Locate the ‘Home Screens’ option and click on the same.
- Tap on the ‘App Library Only’ option in the next window, and a tick-mark will appear in front of the same.
- Turn the slider on for the ‘Show in App Library’ option.
Following the steps correctly will enable the app downloads to appear only in the App Library. Thus, the home screen of your iPhone won’t display the apps.
How to Locate Apps Organized in Categories in the App Library Section?
Want to dig deeper into the App Library section? Here’s how to do the same:
- Go to the ‘App Library’ screen.
- Tap the larger icons to launch the app.
- If you don’t find the desired app, click on the smaller icons based on the category. For instance, if you want to launch any gaming app, tap on the group that is categorized as games.
If you think that finding apps this way is time-consuming, you can use the Search Bar at the top of the screen to search for the desired app.
How to Hide a Home Screen Page?
The idea of combining the home screen widgets and App Library sounds fun, right? You can also create a separate Home Screen page that can be kept hidden until you choose to view it. For instance, create a Home Screen page with the applications you use for work and hide it after the office hours. The steps to hide a Home Screen Page are:
Note: You’ll have to keep all the apps you want to hide on one Home Screen page.
- Press and hold on the blank space of a Home Screen Page.
- The apps will start jiggling. Now, tap on the series of dots at the bottom of the page.
- Each Home Screen is appointed a dot. Therefore, tap on the dot for which you want to hide the Home Screen.
Interestingly, you can create multiple Home Screen Pages and hide them to keep yourself from distraction.
In case you decide to unhide a Home Screen Page, follow the same steps as mentioned above and tap on the dot to mark the same. As soon as you do it, the hidden Home Screen Page will return to its place.
The whole process of managing the App Library on your iPhone is an excellent idea as it will not only keep the applications organized but present a clutter-free home screen.
0 Comentários 0 Compartilhamentos 5K Visualizações 0 Anterior -
Cannot backup to iCloud? Here Are Some Fixes
#iCloud #BackupFailed
https://jonsnow917340901.wordpress.com/2020/09/03/cannot-backup-to-icloud-here-are-some-fixes/
It’s good if you have backup habits for your important files and data stored on your device. If you are using an iOS device, then you can easily **** up all your data by manually connecting your device to PC and then **** up your data in iTunes or by visiting the Finder section.
Cannot backup to iCloud? Here Are Some Fixes #iCloud #BackupFailed https://jonsnow917340901.wordpress.com/2020/09/03/cannot-backup-to-icloud-here-are-some-fixes/ It’s good if you have backup habits for your important files and data stored on your device. If you are using an iOS device, then you can easily back up all your data by manually connecting your device to PC and then back up your data in iTunes or by visiting the Finder section.It’s good if you have backup habits for your important files and data stored on your device. If you are using an iOS device, then you can easily back up all your data by manually connecting your device to PC and then back up your data in iTunes or by visiting the Finder section. You have another option to back up your files and folder with the help of iCloud. This process is automatic, but sometimes users face some issues while backing-up their necessary data to iCloud services.
In case you are facing trouble with iCloud backup, follow these straightforward guidelines to fix this annoying issue.

Enabling iCloud Backup
First of all, it is recommended to ensure that you have enabled iCloud Backup for your device. It’s like a rule of thumb to perform smooth Backup.
Here is how to check and enable iCloud Backup on your device:
- First of all, tap the gear icon located on your iOS device.
- Once the setting page launches on your screen, hit the Apple ID panel parked at the uppermost section.
- Then, hit the iCloud option.
- Scroll your page down to locate the iCloud Backup option.
- Now, you have to ensure that the iCloud toggle is properly turned ON. A green light will blink if the service is activated.
- Then, press the OK button to verify if it is nor previously activated.
- Usually, iCloud Backup takes place at night if your iPhone is connected to a power source.
Checking Storage Space Before Backing Up to iCloud Services
The Backup will be canceled if you don’t have enough backup space for iCloud on your account. You have to ensure that your iCloud account has enough space just before going through the backing up process. To check the iCloud account storage, pursue these instructions. The complete instructions are easy to use for those who want to get acquainted with iCloud features and its associated services.
- First and foremost, tap the Settings icon located on your device, be it iPhone or iPad.
- Then, hit the banner related to your Apple ID situated at the uppermost portion of the Settings page.
- Then, hit the iCloud tab there.
- Now, you will check the iCloud storage of your account on the upper portion on the screen.
- Then, hit the Manage Storage option there.
- Press the Backups tab.
- After that, hit the device for which you desire to see the next backup size.
Steps to follow if the Previous iCloud Backup Failed
In case you see an error alert related to the failure of your last iCloud Backup, then there might be some reason behind it. You have to ensure these things:
- Check and ensure that you are properly connected to a strong internet connection.
- Now, ensure that your device is currently running with the latest edition of iOS or iPadOS.
- In case the WiFi is available, then it is recommended to use it.
Once you are all set with strong WiFi connectivity and updated iOS, then you may follow these guidelines to start the manually operated iCloud Backup:
- First of all, tap the Settings icon to launch.
- Then, click the respective banner of your Apple ID located at the top section of the page.
- After that, press the iCloud section.
- Scroll down the page and search the iCloud Backup option. Once found, tap the same.
- Now, press the “Backup Now” option.
- Then, you have to wait for a while; it may take several minutes to process the result based on the quantity of data you are backing up.
Conclusion
It is always recommended to backup your data before performing factory settings or resetting the device for the recovery process. In Apple devices, you can easily backup your data and essential files in Finder or iTunes library through manual mode. In case you opt for the iCloud process, you have to enable the device for automatic Backup through iCloud services.
0 Comentários 0 Compartilhamentos 5K Visualizações 0 Anterior -
How to Use or Disable iCloud Optimized Storage Space on Mac?
#iCloud #DisablingOptimizedStorage #Mac
https://jonsnow917340901.wordpress.com/2020/09/03/how-to-use-or-disable-icloud-optimized-storage-space-on-mac/
If your ****is running low on storage space, you can make more room by optimizing the storage space.
How to Use or Disable iCloud Optimized Storage Space on Mac? #iCloud #DisablingOptimizedStorage #Mac https://jonsnow917340901.wordpress.com/2020/09/03/how-to-use-or-disable-icloud-optimized-storage-space-on-mac/ If your Mac is running low on storage space, you can make more room by optimizing the storage space.If your Mac is running low on storage space, you can make more room by optimizing the storage space. Customizing and optimizing storage space on a Mac device is not a challenging process, but users need to perform some workarounds on their device. Here is how to customize and deactivate Optimized Storage Space on Mac.
Stop Syncing Desktop and Documents folder in iCloud on Mac
One can easily stop the process of syncing various documents to the desktop in iCloud on Mac. Once you have disabled the syncing procedures, desktop files will no longer appear on the secondary Mac’s desktop, but you are easily able to see them in a separate file on iCloud.

To stop the syncing process on your Mac, follow these guidelines:
- First and foremost, tap the Apple icon located at the top-left edge of Mac’s display.
- Then, press the System Preferences section to launch on your Mac. This option is usually available in the pull-drop menu.
- After that, hit the Apple ID.
- Now, press the iCloud storage.
- Next, tap the Options section located just after the Drive of iCloud.
- Hit the uncheck box for Documents and Desktop folders.
Disabling Optimized Storage on Mac
Usually, the process of optimized storage automatically wipes up TV shows and iTunes movies that have been watched earlier by the user on a Mac device. It only keeps the latest mail items and attachments on your macOS once the hard drive begins to run out of the room. You might need to deactivate the Optimized Storage process on Mac just because you don’t wish to lose anything through the re-download process by Optimization.
In order to deactivate Optimized Storage on Mac devices, follow these straightforward instructions:
- At the start, tap the Apple icon situated at the top left-hand side edge of Mac’s home screen.
- Then, launch the System Preferences page by tapping the appropriate section of the same. This option will be available via the pull down menu.
- Now, press the Apple ID and tap on iCloud.
- Hit checkbox to uncheck the feature. The option is parked at the lowermost section of the respective window for Optimizing your entire Mac Storage.
Automatically Disabling Empty Trash on Mac
You may easily disable the Empty Trash automatically on Mac devices.
- Firstly, launch the Finder screen on your Mac.
- Then, tap the Finder button situated at the uppermost left-hand side section of your Mac’s display.
- After that, press the Preferences tab present into the pull drop menu.
- Hit the Advanced tab located in the section of the Finder Preferences page.
- Now, you have to unmark the checkbox related to the option of removing several contents and items directly from Trash after thirty days.
Customizing Apps and Programs on iCloud on Mac Device
If you wish to customize apps as per your desire, then follow these steps carefully:
- First of all, hit the Apple icon located at the top left-hand side edge of your screen.
- Then, hit the System Preferences tab situated in the pull-down menu.
- Next, tap on the secured Apple ID.
- Now, press the iCloud button.
- Tap on Options located just after the option of iCloud Drive.
- After that, you need to unmark the marked box related to the apps or programs whose contents or files you don’t desire to store on your Mac in iCloud storage.
Managing Files and Folders Kept in iCloud on Mac
- First and foremost, tap the Finder icon to launch the Finder page.
- Then, choose the option “iCloud Drive” by navigating the sidebar section.
- After that, perform a double click on the particular folder to show its contents.
- Choose a particular file that you desire to remove. You may choose more than one file at a time.
- Then, perform a right-click or tap Control + Click on the files you wish to select to delete.
- Now, choose the option “Move to Trash” to remove them.
It is recommended to remove unnecessary and annoying files and data to leave some space for important files. There are various methods to customize and disable Optimized Storage Space directly on a Mac device.
SOURCE:- How to Use or Disable iCloud Optimized Storage Space on Mac?
0 Comentários 0 Compartilhamentos 5K Visualizações 0 Anterior -
How to Save Pictures as JPEG Instead of HEIC On iPhone
#JPEGImages #HEICimages #iPhone
https://jonsnow917340901.wordpress.com/2020/09/03/how-to-save-pictures-as-jpeg-instead-of-heic-on-iphone/
Apple offers HEIF (High-Efficiency Image File) and HEIC (High-Efficiency Image Container) formats to its devices for default camera apps to enhance the quality of pictures.
How to Save Pictures as JPEG Instead of HEIC On iPhone #JPEGImages #HEICimages #iPhone https://jonsnow917340901.wordpress.com/2020/09/03/how-to-save-pictures-as-jpeg-instead-of-heic-on-iphone/ Apple offers HEIF (High-Efficiency Image File) and HEIC (High-Efficiency Image Container) formats to its devices for default camera apps to enhance the quality of pictures.Apple offers HEIF (High-Efficiency Image File) and HEIC (High-Efficiency Image Container) formats to its devices for default camera apps to enhance the quality of pictures. HEIF, HEIC, or HEVC are the most efficient formats for iOS consumers.
These new formats enable the user to store more photos and data on their devices as they are storage-friendly because they consume less space than other formats. The downside is that the images and videos taken in these newer formats are no longer supported by web and older devices. You may be asked to convert the image file to JPEG. Conclusively, we can say that the HEIC or HEIF formats are not universally supported. For instance, if your friends have Windows PC or an outdated Android device or even earlier edition of Mac, in this case, if you share those HEIF or HEIC pictures, they won’t be able to view it. Here, you need to send them the image in a universal picture format that is JPEG.

Saving Pictures as JPEG format instead of HEIC or HEIF on iPhone
To save iOS pictures as JPEG instead of HEIF or HEIC, follow these straightforward instructions:
- First of all, you need to tap the gear-shaped icon called “Settings” on your device’s screen.
- Then, hit the Camera option.
- After that, press the Formats section and proceed with various tools and features on the screen. You need to modify the iPhone camera format to the option “Most Compatible” from the default one. The settings of “Most Compatible” will save images automatically as JPEG files and videos in the format “H264.”
Converting HEIC to JPEG on your iOS Device
In case you have an image saved in the format of HEIC, and you need to transform it into universally accepted “JPEG,” then it is recommended to follow these below-written methods:
- Email your images: Apple provided a built-in Mail app to its consumers. It can be used to transform HEIC files to JPEG automatically on sending as email, even if the real size is chosen.
- Using Photo Editing Apps: iOS users have the choice to edit images and convert to JPEG by using Photo editing applications. You can use “Adobe Lightroom CC” for this task. It supports launching image files in HEIC formats. You may then easily export these image files to JPEG format or any of the compatible file formats.
- OneDrive Camera Upload: OneDrive helps the users transform HEIC or HEIF files to JPEG prior to uploading it. It works similarly as Dropbox, and one can easily use the features of OneDrive on iPhone.
- Dropbox Camera Upload: If you have access to the Dropbox utility features to upload iPhone images automatically, you can easily configure to transform every item to JPEG just before uploading. In order to use the Dropbox camera features to convert your image file to JPEG, follow these instructions:
- Tap the Settings icon to launch.
- Now, hit the Account section.
- After that, press the Camera Uploads option and then hit the “Save HEIC Photos As” option. Now, choose the JPG option there.
Converting JPEG Formats Automatically on Transferring Image file to Mac or PC
Follow these straightforward steps to let the device to automatically convert JPEG images while transferring image files to PC or Mac:
- First and foremost, tap the gear-shaped Settings icon located on your screen.
- Then, tap the Photos option. You may need to scroll the page.
- Now, locate the option “Automatic” and tap on the same. The option will be located at the lowermost section of the display just beneath the option “Transfer to Mac or PC.”
- Finally, reboot the device.
Conclusion
While the HEIF or HEIC picture formats consume less space on systems stored, they are not supported universally. Users face issues in handling these formats. By following the steps mentioned above, you can save images as JPEG on your iPhone.
SOURCE:- How to Save Pictures as JPEG Instead of HEIC On iPhone
0 Comentários 0 Compartilhamentos 4K Visualizações 0 Anterior -
How to ****-up to a Shared Folder with Time Machine on Mac?
#TimeMachine #BackuptoSharedFolder
https://jonsnow917340901.wordpress.com/2020/09/03/how-to-****-up-to-a-shared-folder-with-time-machine-on-mac/
Time Machine is the backup application that comes inbuilt with ****devices running on macOS.
How to Back-up to a Shared Folder with Time Machine on Mac? #TimeMachine #BackuptoSharedFolder https://jonsnow917340901.wordpress.com/2020/09/03/how-to-back-up-to-a-shared-folder-with-time-machine-on-mac/ Time Machine is the backup application that comes inbuilt with Mac devices running on macOS.Time Machine is the backup application that comes inbuilt with Mac devices running on macOS. It can also be used as a desktop OS program developed by Apple. It performs backup tasks with the help of AirPort Time Capsule, Hard Disk, and the Wi-Fi router. The machine manages to create backups of several data files that can be quickly restored at any later date.
Backing up to a Windows shared folder using Time Machine on a Mac device is not a difficult task. Read on to learn more.

Set up a Windows Share Location
The user needs to have a shared location generated and accessibility to the Mac on which they wish to run the Time Machine. For instance in case you own a Windows PC with the name “Server” and a compatible network sharing folder on the same Windows machine named “share,” you need to test the connectivity issues by performing these instructions:
- At the start, tap the Finder section.
- Then, press the Go tab and then press the Connect to Server option.
- After that, you need to type “smb: //Server/Share.” Here “server” is the name of the particular Windows PC, and “share” is shared-folder.
- Next, hit the Connect tab.
- Once you are all set with everything, you will be automatically prompted to provide a registered user ID and secured passcode. Type the same as directed on the screen. You may use these credentials to save for your device to log in if asked in the future automatically. You will see various options such as “Share in Finder” in the Shared section and also the Eject icon located just after it.
Creating a Sparsebundle Image
Now, you will need to create the respective image file that will be used as an APFS file system for the backup process on your Mac device. To create the image file on your system, follow these instructions:
- First and foremost, start the Utility Disk.
- Then, navigate to the File menu and then hit the New Image option.
- After that, press the Blank Image.
- Next, now you have to provide a new name to Save As to TimeMachine.
- Then, hit the drop-down arrow located just after the “Where” option.
- Choose your mounted Share option.
- Next, rename the name of the particular sparse bundle.
- Now, you will be required to choose the size of your backup location. In case you wish to get yourself at the stage of extreme least backup in regard to the entire contents of your complete hard drive, then it is recommended to select the size as equivalent to the size of your Macintosh HD drive.
- Once you are all set, ensure that the format is compatible adjusted to your Mac OS Extended.
- Hit the Save once you have finished all your steps.
- Tap the Done tab there.
Making Time Machine use the Remote Share and File
- Launch the Terminal.
- Type the path into the field “ sudo tmutil set_destination/Volumes_TimeMachine/.” Here the Time Machine is the name you have provided to your sparse bundle generated with the Disk Utility feature.
- Now, type the secured passcode if asked.
Checking Time machine
Users are requested to check the Time Machine and verify disk performance and check that it is properly ready to use for backup.
Follow these guidelines to check the Time Machine properly:
- First and foremost, tap the System Preferences section to launch.
- Then, hit the Time Machine option there.
- Now, you will be able to see that the Time Machine has a particular backup location. Then choose the relevant DiskDisk, which shows the name of your sparse bundle.
When it comes to backing up Mac data to Windows shared folder, you need a utility program to complete the whole process. Time Machine lets the user backup any data directly from the Mac device to any shared folder. It can capture the most recent state of your data on the particular DiskDisk and restore the complete system or particular file from the recovery section.
SOURCE:- How to Back-up to a Shared Folder with Time Machine on Mac?
0 Comentários 0 Compartilhamentos 4K Visualizações 0 Anterior -
How to Quickly Hide the Desktop Icons without Using Terminals?
#HideDesktopIcons #WithoutTerminals
https://jonsnow917340901.wordpress.com/2020/09/03/how-to-quickly-hide-the-desktop-icons-without-using-terminals/
Want to hide your ****rsquo;s desktop icons without the use of Terminals? We are providing some information on how to quickly hide your desired app icons without using Terminals.
How to Quickly Hide the Desktop Icons without Using Terminals? #HideDesktopIcons #WithoutTerminals https://jonsnow917340901.wordpress.com/2020/09/03/how-to-quickly-hide-the-desktop-icons-without-using-terminals/ Want to hide your Mac’s desktop icons without the use of Terminals? We are providing some information on how to quickly hide your desired app icons without using Terminals.Want to hide your Mac’s desktop icons without the use of Terminals? We are providing some information on how to quickly hide your desired app icons without using Terminals. Before going in-depth, we want to describe what the terminals are. In general terms, it’s a command-line system that makes the user capable of managing and handling several kinds of macOS with several modification features.
Users can use third-party apps to hide or delete desktop icons directly on the particular device running on macOS. They can also use terminals if they want to do so.

Pursue these straightforward methods to hide or remove desktop icons on Mac:
Using Third-Party Programs to Hide Desktop Icons
Use a reliable program to hide or remove desktop icons as per your requirements, such as:
Hidden Me: It helps the user to remove the entire app icons directly from the desktop screen. In case you wish to avail premium services towards hiding or removing apps, then upgrade to the pro-edition that will unlock multiple features and display support tools.
Desktop Icons Hider: This app is highly-rated among top hiding apps that help you remove the desired icon from various screens at a time.
Using Terminal for Hiding or Deleting Desktop Icons
You can easily use the terminals if you know the correct commands. You can follow these straightforward instructions on Mac to remove or hide desktop icons by using built-in tools:
- First of all, tap the blank space directly on the screen of your Mac in order to make sure that no program is chosen.
- Hit the Go tab there.
- Tap the utility tab.
- Scroll your page down and then perform a double click on the option Terminal once the “Utilities” page appears on the Mac screen.
- Enter the default keywords “com.apple.finder_CreateDesktop False.”
- Then, hit the Return tab there.
- Now, you need to restart Finder and then hit the Return tab.
- The icons will be removed from the desktop screen of your Mac.
Bringing Back Desktop Icons on Mac through Terminals
Proceed with these steps once you are all set to view the respective icons on the desktop screen of Mac:
- First of all, tap the blank space on the home display of your Mac device in order to make sure that no program is selected.
- After that, ensure that the Finder is displaying at the left-hand side edge of your menu bar.
- Then, tap the Go button there.
- Hit the Utility option and then scroll down the page, then apply double-hit on the option “Terminal” once the utility window appears on your screen.
- Now, you need to enter “com.apple.finder _CreateDesktop_True.”
- After that, hit the Return tab.
- Next, restart the Finder and proceed.
- Then press the Return option.
- Now, you will see that all the apps icons have been successfully returned to your Mac home screen.
There are several methods to remove or hide desktop icons on Mac devices such as third party apps and terminals. Use compatible and reliable third party apps for this task. If you are using terminals, then use the right commands to hide or remove your desired icons from the home screen of your device.
SOURCE:- How to Quickly Hide the Desktop Icons without Using Terminals?
0 Comentários 0 Compartilhamentos 4K Visualizações 0 Anterior -
How to Reset or Restart Your HomePod
Reset Homepod,Reboot Homepod,
https://jonsnow917340901.wordpress.com/2020/09/04/how-to-reset-or-restart-your-homepod/
Let’s say it straight away! As big as the Apple brand is, things could go off now and then. Therefore, knowing how to fix issues that happen with your Apple devices is the best possible solution.
How to Reset or Restart Your HomePod Reset Homepod,Reboot Homepod, https://jonsnow917340901.wordpress.com/2020/09/04/how-to-reset-or-restart-your-homepod/ Let’s say it straight away! As big as the Apple brand is, things could go off now and then. Therefore, knowing how to fix issues that happen with your Apple devices is the best possible solution.Let’s say it straight away! As big as the Apple brand is, things could go off now and then. Therefore, knowing how to fix issues that happen with your Apple devices is the best possible solution.
Nowadays, everybody’s upgrading their home with smart appliances and new devices. Thus, HomePod is an essential part of the same. It is a speaker that delivers high-fidelity audio and adapts to its surroundings.
Things can not be in your favor all the time. Thus, HomePod can create issues, including disconnection, freezing, etc. If you own a HomePod that has gone mad and stopped working, you can try restarting the same before giving it a complete reset.

Below is a guide on fixing your HomePod before throwing it away if it doesn’t work later.
Restarting the HomePod
There are two ways to restart a HomePod: Direct restart and Using the Home app to restart.
Direct Restart
Directly restarting a HomePod is no science. It is a very simple method and the steps to reset your HomePod are:
- Disconnect or unplug your HomePod.
- Wait for a few seconds or a minute.
- Plugin your HomePod.
Note: You’ll temporarily lose access to all the accessories connected to the hub, the HomePod.
Using the Home App to Restart
If you don’t want to use the Plug for restarting, you can use the Home app on your iPhone or iPad to restart your HomePod. The steps to restart your HomePod using the Home app are:
- Go to the ‘Home’ app on your Apple device.
- Click on the ‘Rooms’ tab at the bottom of the screen.
- Locate the Room where the HomePod is placed by swiping left or right.
- Press and hold the HomePod section.
- Click on the ‘Settings’ icon.
- Locate the ‘Reset HomePod’ option and click on the same.
- Select ‘Restart HomePod’ from the pop-up menu.
Resetting the HomePod
There are two methods to reset a HomePod: Direct resetting and Using the Home app to reset the HomePod.
Direct Reset
The steps to reset your HomePod directly are:
- Disconnect or unplug your HomePod.
- Wait for a few seconds or a minute.
- Plugin your HomePod.
- Place your finger on the touch panel of the HomePod.
- Keep the finger placed until or unless the Siri light turns red.
- When Siri announces the three beeps, remove your finger.
Once you manually reset the HomePod, you’ll have to reset all the settings with your iPhone or iPad.
Using the Home App to Reset
The steps to reset your HomePod and give it a fresh start are:
- Go to the ‘Home’ app on your Apple device.
- Click on the ‘Rooms’ tab at the bottom of the screen.
- Locate the Room where the HomePod is placed by swiping left or right.
- Press and hold the HomePod section.
- Click on the ‘Settings’ icon.
- Locate the ‘Remove Accessory’ option and click on the same.
- Click on the ‘Remove’ option to confirm.
This is it! Restarting a HomePod is not a difficult process. However, you’ll have to be very careful if you’re restarting the same via the Home app as one wrong click can reset the device. Also, opt to reset your HomePod when there is no possible fix left. Else, you’ll lose all the settings and will have to reset the same from scratch.
SOURCE:- How to Reset or Restart Your HomePod
0 Comentários 0 Compartilhamentos 3K Visualizações 0 Anterior -
How to Host a Virtual Listening Party Using Spotify
Spotify,Virtual Listening PArty,
https://jonsnow917340901.wordpress.com/2020/09/04/how-to-host-a-virtual-listening-party-using-spotify/
You all surely miss attending get-together and having fun with your friends and family. Unfortunately, sitting at home is the only option to keep yourself protected and safe during this ongoing pandemic.
How to Host a Virtual Listening Party Using Spotify Spotify,Virtual Listening PArty, https://jonsnow917340901.wordpress.com/2020/09/04/how-to-host-a-virtual-listening-party-using-spotify/ You all surely miss attending get-together and having fun with your friends and family. Unfortunately, sitting at home is the only option to keep yourself protected and safe during this ongoing pandemic.You all surely miss attending get-together and having fun with your friends and family. Unfortunately, sitting at home is the only option to keep yourself protected and safe during this ongoing pandemic. What if there were virtual ways to have fun with your loved ones?
Just as you could attend virtual movie nights with your friends, Spotify has brought you a virtual listening party feature to make you feel closer to your confidants. The feature enables up to five people to listen to podcasts or music altogether.
Unfortunately, you cannot chat along with listening to music, but every participant can play, play, skip, and add other content for everyone to listen to. All you need to have is a Spotify Subscription and a mobile app, and you’re all set.

How to Create a Spotify Group Session?
The steps to start a Spotify listening party are:
- Launch the ‘Spotify’ application on your Android or Apple device.
- Play any song or a podcast of your choice.
- While you play music or a podcast, click on the ‘Available Devices’ icon in the bottom-left corner.
- A list with all the available devices will appear. You’ll see a ‘Start Session’ option if you’re a Spotify subscriber. Thus, click on the same.
- Now, you’re available for other participants to join. If a participant is near you, they can join-in by scanning the group session code. Also, you can invite your friends by sending a unique code via third-party apps.
- You can also copy the link to your session and share it with others.
How to Join an Existing Spotify Group Session?
The steps to join-in an existing Spotify listening party are:
- Launch the ‘Spotify’ application on your Android or Apple device.
- Play any song or a podcast of your choice.
- While you play music or a podcast, click on the ‘Available Devices’ icon in the bottom-left corner.
- Click on the ‘Scan to Join’ option beneath Start Session.
- You can use the camera of your device to scan the code and join the group if the host or any other member is nearby. Else, you can ask for the link to the group session.
- Once you receive the link, click on the same and you’ll land on the Spotify main screen.
- A pop-up menu will ask you for your joining permission. Select ‘Join Session’ or ‘Not Now’ to decline.
How to End a Spotify Group Session?
The steps to end a Spotify group session are:
- Launch the ‘Spotify’ app.
- Open the song or podcast currently playing.
- Click on the ‘Available Devices’ icon.
- Click on the ‘End Session’ option.
- Select the ‘Confirm’ option from the pop-up menu for confirmation.
Once you confirm ending the session, you’ll have to restart the listening party for another round.
Pretty simple, isn’t it. Spotify listening party is a great way to remain connected with your loved ones via music or podcasts. Make sure you buy the Spotify subscription to get your hands on this amazing feature.
SOURCE:- How to Host a Virtual Listening Party Using Spotify
0 Comentários 0 Compartilhamentos 3K Visualizações 0 Anterior -
How to Print Using a Printer From Your iPhone & iPad
Use Printer,iPhone,iPad ,
https://jonsnow917340901.wordpress.com/2020/09/04/how-to-print-using-a-printer-from-your-iphone-ipad/
Everyone has moved on from all kinds of traditional activities, including the use of a PC and a printer to get out the hard copies, pictures, etc.
How to Print Using a Printer From Your iPhone & iPad Use Printer,iPhone,iPad , https://jonsnow917340901.wordpress.com/2020/09/04/how-to-print-using-a-printer-from-your-iphone-ipad/ Everyone has moved on from all kinds of traditional activities, including the use of a PC and a printer to get out the hard copies, pictures, etc.Everyone has moved on from all kinds of traditional activities, including the use of a PC and a printer to get out the hard copies, pictures, etc. Now, the digital era has overpowered the old and clumsy methods of carrying out all the jobs.
Need to print something from your iPhone or iPad? No worries! Apple’s AirPrint technology is the most convenient option that enables the iPhone and iPad users to print anything wirelessly. Are you surprised? Well, you should be. AirPrint uses the Wi-Fi connection to convey anything that you want to print to the printer, eliminating the need for unnecessary cables.
All you need to do is set up the printer correctly, and you’re ready to experience the fun printing out your favorite pictures.
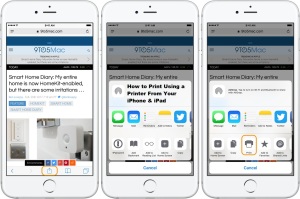
How to Print Using an iPhone and iPad?
Before starting the process of setting up a printer, it is essential to make sure that your printer supports AirPrint technology. Thus, you can check the same on Apple’s official site. Also, begin with connecting your printer and your iOS device with the same internet connection to work. Follow the steps mentioned below to set up the printer:
- Open an image, document, webpage, etc, on your iPhone or iPad that you want to print.
- Tap on the ‘Share’ icon at the bottom of the window.
- A menu will open. Locate the ‘Print’ option and click on the same.
- Another printing menu will appear. Click on the drop-down menu for the ‘Printer’ option to select the printing device you want to use.
- All the printing devices connected to the same internet connection will appear in the next window. Tap and select the name of your printer to continue.
- A Printer Options menu will open. Select the number of pages you want to print and re-check the page count.
- Select the number of copies you want.
- Once you’re done setting the info regarding the same, hit the ‘Print’ option on the screen’s top-right corner.
If you set up the printer and follow all the steps correctly, it’ll take no time to print as many hard copies as you want. Pretty easy, right?
In case your printer does not support the AirPrint technology, you may look for other applications that offer you to print wirelessly. All you need to do is download the third-party apps from the App Store and link it with your printer. Applications like PrintShare and Cloud Printer can work fine in the absence of an AirPrint. Third-party applications are not as convenient as AirPrint, but they can work well if you don’t want a traditional and messy setup consisting of innumerable wire connections.
SOURCE:- How to Print Using a Printer From Your iPhone & iPad
0 Comentários 0 Compartilhamentos 3K Visualizações 0 Anterior


Mais Stories